Polly sample preparation describes a carbonate preparation vacuum line used for processing samples for clumped isotopic measurements on Polly, a Thermo MAT253. Carbonate samples loaded into the autosampler are dropped and digested in a 90 °C phosphoric acid bath. Evolved carbon dioxide is purified and flame sealed into a Pyrex tube. Adjacent to the automated line is a glass line for manual and more varied processing. The automated side is monitored and controlled by LabView software. Automated valves (V), gauges (G), manual valves (MV), and traps (T) are all numbered indicating the location on the line. Diagrams in this document illustrate the locations and numbers of V, MV, G, and T. This protocol describes how to use the automated line as well as how to create reference frame gases with the glass line. Use the Quick Start section if you already have a good idea of what you are doing. See below the Quick Start section for more thorough descriptions.
It will take about 30 minutes to get the line ready. Each sample will take about 60 minutes to process (30 minutes to prepare the sample, 30 minutes to bake out the line). The last sample only takes about 30 minutes because the line does an overnight bakeout.
The mass 47 signal is TINY and thus very easy to influence. The most likely way to generate an erroneous Δ47 value is by allowing your CO2 to interact with water in the prep line. This resets your Δ47 value towards room temperature. It is therefore absolutely critical that we keep the line as dry as possible. Even though we have gone to great lengths to automate and simplify this procedure, your actions while prepping samples can saturate the line with water making it unusable for weeks. As such, it is ESSENTIAL that users of this line have a thorough understanding of basic vacuum line mechanics, and must demonstrate so prior to use, so as to avoid flippant mishaps.
Safety
Appropriate precautions should be taken to protect yourself against the cold temperatures and phosphoric acid associated with this method. Wear safety glasses and leather gloves when handling liquid nitrogen. Wear nitrile gloves and safety glasses when changing the phosphoric acid. Transfer acid from stock container to vessel and from vessel to waste in a chemical fume hood. Users are expected to know the contents of the SDS for phosphoric acid.
Critical Rules
NEVER have V1 and V2 open at the same time
ALWAYS know the state of the turbo pump before manually adjusting any valve
ALWAYS make certain the dewars are lined up with the traps before each sample
NEVER leave the file ‘PollyPrepLine_AutoLog.txt’ open
ALWAYS be gentle with the autosampler and associated glass drop tube
ALWAYS leave the pyrex tube containing your sample in liquid nitrogen after sealing with the torch until the tip is room temperature
Terse Procedure
You should be able to ace this quiz if you are relying on the terse procedure
Turn OFF 'Overnight Bakeout'
Turn ON 'Start up prep line'
WAIT - allow the script to run for a minute or so to ensure it completely starts up
Turn off torch oxygen (green cylinder) and natural gas
Put ethanol dewars in walk-in freezer
Pour liquid nitrogen from trap dewars back into larger overnight dewars
Put foil lid on T3 ethanol dewar
Exhaustive Protocol
Labview Software
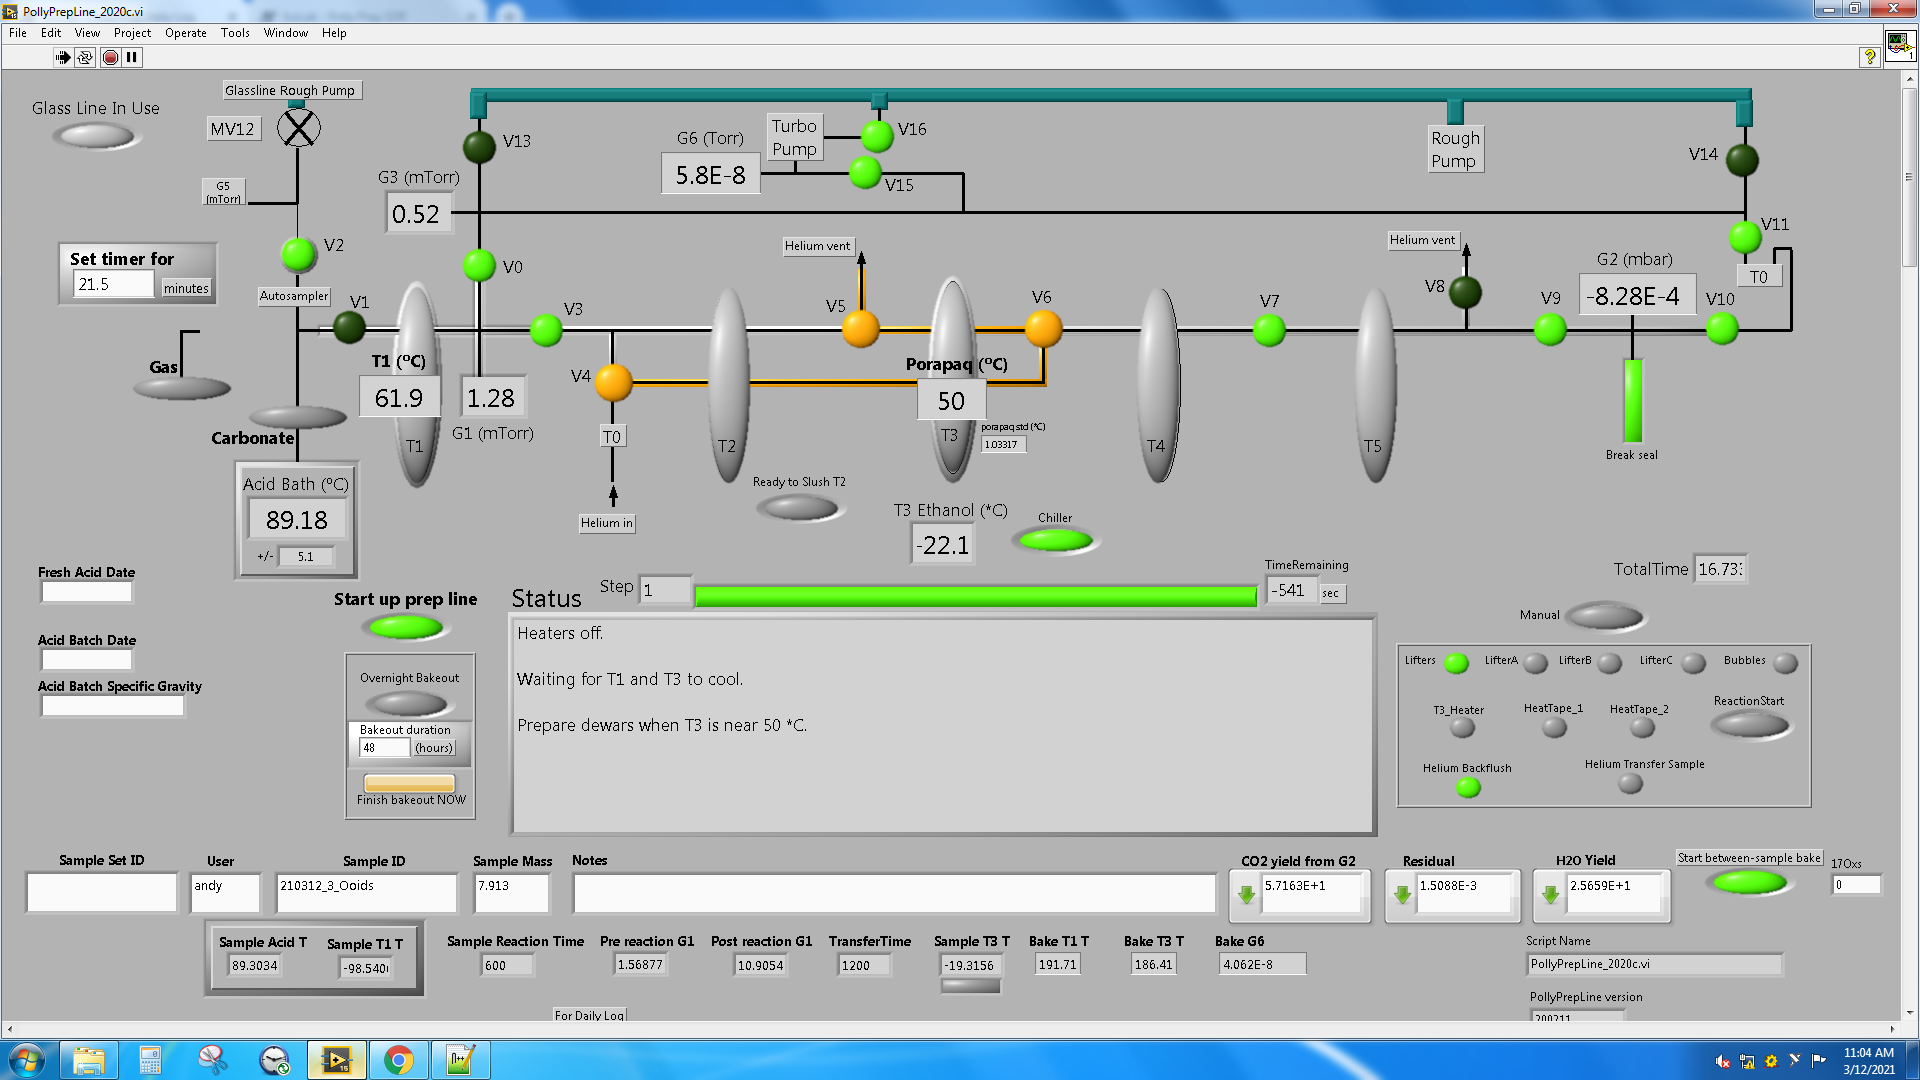
Labview Polly Prepline diagram
LabView is software written by National Instruments (NI). The LabView software program to run the automated line is called PollyPrepLine_*.vi, where * is currently "2020b" (see image). It uses color coding on a representative diagram along with status descriptions to help users interface and understand the current state of the line. Valves are circles, light green when open, dark green when closed. Other buttons use the same light green when ON, but are gray when OFF. Three of the valves are switching valves and are orange in one state and green when in the other state. When magenta is observed anywhere on the screen, user intervention is expected. Heat tape is used to remove residual water and is RED when on, light gray when OFF. When the PollyPrepLine.vi script is running, most users leave the windows as is. If you find an unfamiliar appearance, try scrolling up. If the software crashes, you will need to restart the PollyPrepLine_*.vi script. You will know the script is NOT running if you see a grid over the entire diagram and the upper left corner of the windows shows a WHITE 'play' triangle. The script is running properly if the grid is absent and the upper left corner of the window shows a right-pointing BLACK arrow.
To start the labview software, open National Instruments LabVIEW from the Start menu. Click on PollyPrepLine_*.vi. Click the white arrow pointing to the right in the upper left corner of the screen to start the script. If something unexpected happens while prepping samples, see the Troubleshooting section below.
Weighing Samples
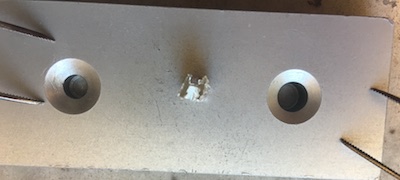
Silver capsule crimped with H pattern
The current target weight for pure carbonate is 6-8 mg. Weigh samples and standards into 5x9 mm silver capsules (NOT TIN). You must KNOW the percent carbonate of your samples. If you do not know the percent carbonate of your samples, stop now and determine the percent carbonate (see Percent Carbonate method). You can also do a kiel run using the qtycal_C1 standards. Calculate the amount you need to weigh in order to have 8 mg of pure carbonate for each of your samples. Consult the microbalance method. Weigh samples into multiple silver capsules if you can't pack the target carbonate amount into a single capsule (you will drop them all at once so the derived CO2 ends up in a single tube). Lightly pinch each capsule closed such that a top-down view looks like an H (see image). Weigh one carbonate standard and as many samples as you intend to run in a single day. Carbonate standards are coral, C2, ETH1, ETH2, and ETH3 and should be run sequentially placing slight emphasis on the colder carbonates (e.g. fewer ETH1 and ETH2).
Natural Gas and Compressed Gas Cylinders
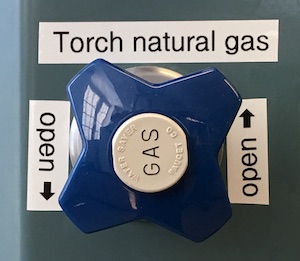
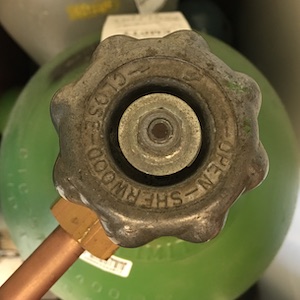
The east fume hood natural gas valve is used for the torch.Make sure this oxygen cylinder valve is open when using the torch.The oxygen cylinder regulator is located closest to the refrigerator. DO NOT ADJUST.
At the beginning of each day you will need to turn on the natural gas and oxygen cylinder for the torch (see images). Likewise, at the end of each day, you will need to turn OFF the natural gas and oxygen cylinder for the torch. Leave the helium cylinder ON. The natural gas control knob is located on the eastern fume hood. The oxygen cylinder is located on the south wall. Turn the oxygen on by rotating the cylinder valve counter clockwise (if looking down on handle). Give it four or five good turns. Do NOT adjust the regulator valve mounted on the wall.
Daily Log
The lab uses a daily log for each instrument or preparation line to allow users a first glance at the readiness of the instrument. By comparing the current state of the instrument to historical states, you are more informed about the instrument and whether or not it is functioning properly and ready to run your samples.
Each daily log is web based and browser accessible. No link is provided here by design. Open the browser on the controlling computer and you should see at least two tabs already open. One tab is this SOP and the other is the daily log. If the browser has more than two tabs open, it may have additional SOPs. Use the bookmark toolbar as needed if tabs have been closed.
Work through each cell of the daily log. If you are uncertain where to find certain information, hover over the column header tip, denoted by a ⓘ symbol.
Make certain to press the 'save to log' button when you are finished entering data.
You are welcome to make notes if you have observed something with or done something to the instrument and would like to document that information. Use the "insert note" link at the top of the daily log to make a note. You may enter notes at any time.
Loading Samples
The autosampler and acid vessel are held under vacuum. In order to load your samples into the autosampler, then, you must vent the acid vessel and autosampler to atmospheric pressure. These steps protect the preparation line while you vent the autosampler and acid to atmospheric pressure. Slowly evacuating the autosampler and acid vessel reduces the chance of sample material ejecting out of the pinched capsule.
Protect Prepline - Turn OFF Overnight Bakeout and turn ON 'Start up prep line'.
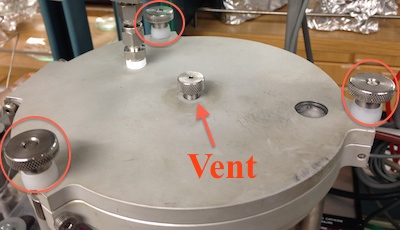
Autosampler lid showing thumb screws and vent
Vent autosampler - Open autosampler lid by loosening each of the three thumb screws, each one a little at a time. Loosen the autosampler vent (round knob on top) until you hear the hissing of air rushing in.
New acid (optional) - Consider loading new acid. Look at the acid. If its sufficiently dirty, has a large amount of sediment, and / or has many silver capsules, you may want to change the acid. See Loading New Acid below. Really, this assessment should have been done at the end of the day when the line was last used.
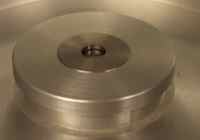
Clean autosampler (optional) - Clean the large o-ring and apply fresh grease as needed. Slide the rounded end of a flat spatula between the outside edge of the o-ring and the autosampler body, making certain you don't scar, puncture, or cut the o-ring. Pull out the o-ring and thoroughly wipe it and the autosampler body. Apply fresh M-Grease to o-ring and work it in with your fingers. Seat the o-ring into place making sure it isn't wrinkling itself back out. Clean the window by wiping it, perhaps using a bit of ethanol on the wipe. Clean the carousel. This could be as easy as blowing it out with the air pressure line located near the balances. You may also wish to remove the carousel by pulling straight up using the center cylindrical portion. After removal you may use the stronger air pressure line located in the mass spec lab hood or under the glassware. Worst case, dismantle the carousel by removing the three screws underneath and soaking it in soapy water overnight. If you do this, rinse heavily with DI water and dry thoroughly in the 60 *C drying oven. Reassemble and return carousel to autosampler, ensuring the center pin and the guide pin underneath line up perfectly. See next section for aligning properly.
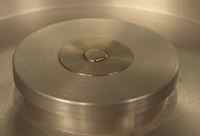
Carousel not properly seatedCarousel properly seated
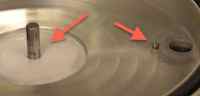
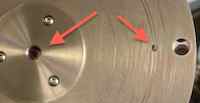
Autosampler shaft and guide pinCarousel shaft and guide-pin holes
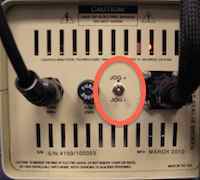
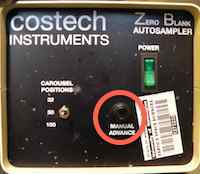
Autosampler control box - rear viewAutosampler control box - front view
Carousel alignment (optional) - It is always a good idea to make sure the carousel holes align perfectly with each other. This step is essential if you remove the carousel for cleaning. Slide the carousel into place aligning the flat side of the center pin with the flat side of the carousel hole. THE CAROUSEL PROBABLY ISN'T ALL THE WAY IN YET. If the center pin is not completely flush with the top of the carousel hole, you must physically rotate the carousel until you feel it drop down 1-2 mm.
There is a guide pin underneath the carousel that needs to fit into its respective hole. Once you have the carousel completely seated into the autosampler, use the Manual Advance button on the front of the control box to move the carousel one position. Now look straight down the carousel hole. If you can see the carousel's bottom plate, you must adjust the position.
On the back of the control box, use the switch labeled Jog+ and Jog- to move the carousel very slowly forwards or backwards, respectively. It is always best to finish your adjustments in the Jog+ direction. When you think you are finished, advance the carousel one position with the Manual Advance button.
Load samples - Use tweezers to move your samples from the 96-well plate to the carousel. Place your first sample in the carousel position immediately adjacent to the hole open to the acid. For example, if the hole through the carousel to the acid is position 17, place your first sample into position 18. Place your next samples in every other carousel position from here, skipping one carousel position between samples.
Evacuate carousel - Close the lid and gradually tighten each of the three screws, then close the vent, (this step assumes the acid vessel is ready to go if you just did fresh acid). Open MV12 and V2, tighten three lid screws as vacuum pulls lid tighter and screws loosen. Watch G5 until it is below 2000 mTorr. If G5 is unable to drop below 2000 mTorr, the vessel is leaking, see Troubleshooting below. Once G5 is below 2000 mTorr, you can move forward to the next G5 threshold of 100 mTorr. While you are waiting for G5 to be less than 100 mtorr, you should prepare the dewars as described in the next section.
Dewar Preparation
-80 °C ethanol slush - Historically we powderized dry ice and mixed it with cooled ethanol. We now just keep the ethanol cool with liquid nitrogen. Obtain the two stainless steel dewars that are stored in the walk-in freezer along with a 4 L bottle of ethanol (called Reagent Alcohol and is 80 % ethanol). Dump both dewars full of ethanol into a white dish tub (under sink if not already on bench top). Pour liquid nitrogen into the white tube with the ethanol and stir with a wooden dowel. Use the handheld thermometer to measure the ethanol temperature. Once it is below -100 °C, pour back into both stainless steel dewars, trying to pour equal amounts of ethanol into each dewar. Room temperature ethanol is stored under the fume hood labeled "Flammable" furthest from the door (also check other flammable hoods throughout the lab). The labview script will not advance unless the labview measured temperature is below -80*C. This is most efficiently achieved by getting the temperature below -100 *C while preparing the dewars. The labview temperature measurement is dampened or severely delayed compared with the handheld temperature measurement. You may notice that the slushes stored in the freezer become difficult to stir over time (weeks). They gradually condense water from the atmosphere making the slush more and more solid and less and less slush. If this is the case, dump the water laden slush into a white tub and allow it to warm before discarding it down the drain. If you have just set this old ethanol aside to warm you will need to start with room temperature ethanol as in the beginning of this paragraph. Use the hand-held digital thermometer to verify the slushes are below -100 °C, but not below -120 °C.
Liquid nitrogen dewars - Dump out the water that is probably in the bottom of these three dewars before filling them with liquid nitrogen. Fill all three liquid nitrogen dewars to be 1-2 cm from the top of the dewar. If you choose to fill the T0 dewar while it is on the lab bench and then raise it into place, wear gloves, and plan on topping off the dewar after the tubing has cooled.
T3 ethanol dewar - Remove foil lid from T3 ethanol dewar and top off with the same ethanol as in the -80 °C ethanol slush. The level of ethanol should be very near full, no more than 1 cm below the top of the dewar. NOTE - The ethanol temperature should be -20 *C. This trap will also harvest water from the atmosphere, as with the -80 °C ethanol slush dewars. If you notice the immersion cooler turning on and off frequently, it's time to dump the ethanol into a white dish tub until it warms up to room temperature before dumping it down the drain. The easiest way to do this is start a syphon and get as much of it out into a white tub set on the floor as you can. Fill the dewar with fresh ethanol and allow to cool.
** The -80 °C ethanol slush dewars are always to the left of the liquid nitrogen dewars within a lifter platform. **
Preparing Samples
So far you have familiarized yourself with the software, weighed your samples, loaded your samples, prepared all dewars, and loaded new acid if needed. Now it is time to start running your samples through the preparation line. This set of instructions assumes you have completed steps 1-9 in the Terse Procedure.
To start your first sample, click one of the two Next Sample buttons. You are probably going to click "Carbonate" but perhaps you are running a reference frame gas, in which case you would click "Gas". This set of instructions assumes you are clicking the "Carbonate" button.
After clicking the "Carbonate" button, WAIT. The software will now raise lifters A and B and wait for T1 to drop below -80 °C. You can help the T1 temperature drop below -80 °C by raising the dewar even more with the piece of wood or you could also mix the slush with a stir rod or by manipulating the dewar itself. Once the T1 temperature is below -80 °C, it will evacuate the acid for 5 minutes. In the labview software, enter your upcoming samples' sample ID and weight. Delete any information that exists in the CO2 yield, residual, H2O yield, and notes fields.
When the software is finished evacuating the acid, it will prompt you to drop your sample. Do this by advancing the autosampler using the "Manual Advance" button located on the Costech autosampler controller box behind the acid bath.
Use the mirror or otherwise watch that your sample actually falls down the drop tube. You should see G1 (gauge 1) increase well past 100 mTorr. If G1 does not rise above 100 mTorr AND you are certain that your sample fell, press the 'ReactionStart' button. If your sample does not fall, see Troubleshooting below.
Set a timer according to the 'Set timer for' window.
After the above time, labview is waiting for you to click the 'Ready to Slush T2' button. Once you click that button, Lifter A drops and you need to move the liquid nitrogen dewar out of the way and slide the -80 °C ethanol slush dewar in its place. You have 5 seconds to do this, so don't waste time after clicking the button. You can make it easier on yourself by removing the wood block before pressing the button. Optionally, you can also use a plastic cup to catch the slush drips.
Check the acid stirring by lifting the insulation and viewing the conditions of the acid. Use a flashlight. The acid needs to be turbulent and the stir bar needs to be synchronized with the stir plate. The stir bar also needs to be off-center from the acid vessel and slightly hitting the side walls of the acid vessel. You can adjust the stir bar by turning the speed down, lowering the lab jack slightly, moving the jack and hot / stir plate until the stir bar is where you want it. Then raise the lab jack so that the plate is just touching the acid vessel. Then turn the stir bar speed up to 1000 - 1200 rpm. Make certain the stir bar is synchronized with the stir plate.
Your sample will now continue moving through the prepline. Set your timer for 21.5 minutes.
When Lifter C drops and traps 4 and 5 are free from the dewars, you can warm up T5 with a dewar filled with room temperature tap water (NOT HOT WATER). Move the liquid nitrogen dewar out of the way, and hold the room-temperature water dewar with your hand so that T5 is submerged. You can use a plastic pipette to drop water onto the, still frozen, top of T5. Once the trap is completely thawed, you can remove the water dewar and dry the trap with a paper towel.
Take your yield measurement now. Type it into the labview software screen in the "CO2 yield from G2" field. You may also click the green down arrow to grab the current value of G2.
Freeze the tip of the 6 mm pyrex tube with liquid nitrogen in a little dewar held in place with the wooden stand.
Wait for G2 to drop to its lowest value and then record this value in the "residual" field in the labview software. It should be very near zero and is usually exactly zero.
Close valve 9 by clicking the V9 button on the labview software.
Flame seal the tube as described in the "Flame sealing your sample" section below.
Once your sample tube is free, LEAVE IT IN THE LIQUID NITROGEN until the flame sealed part is room temperature.
Remove the, still HOT, bit of pyrex from the prepline by loosening the ultra-torr with your fingers and pulling the pyrex bit out with pliers (or spanner if you like). If the ultra-torr is too hot to touch, you are heating it up too much with the flame. Move the flame lower on the tube, adjust the flame so it is tighter, or hold the flame in a consistent location.
Install a new 6 mm pyrex tube. These are located in the drying oven behind you. You may also find them in the drawer below the prepline called "Clumped isotope glass tubes".
Click the "Break seal" button on the labview software. This triggers Lifter A to drop.
If you pulled the pyrex tube from the drawer, heat it up using a dull bushy flame that is all blue (no yellow). Lightly flame the pyrex tube taking care NOT to heat it up to much so as to melt or deform it.
Now move the T2 -80 °C ethanol slush away from the lifter and thaw T2 with the water filled dewar just as you did for your CO2 sample. Watch G1 and wait for it to stabilize.
Once G1 is somewhat stable, record the value into the 'H2O yield' field and then press the 'Start between-sample bake' button located immediately right of the 'H2O Yield' cell.
The between-sample bake out now begins. Set a timer for 20 to 30 minutes. If that was your last sample, go to the "End of day routine" section below. You do not need to wait for the between sample bakeout.
If you have more samples to run, after about 30 minutes, the line should be baked out and cool, ready for the next sample. Return to step 3 in this "Preparing samples" section, to start another sample.
Pro Tip - start preparing the dewars when the porapak temperature is about 50 °C.
Flame Sealing Your Sample
The CO2 from your carbonate sample ends up being frozen into a 6 mm pyrex tube. You must use the torch to melt the pyrex and seal the tube while the CO2 is frozen. The torch has two knobs. The red knob turns the natural gas on. The green knob turns the oxygen on.
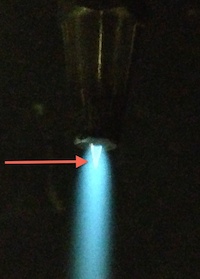
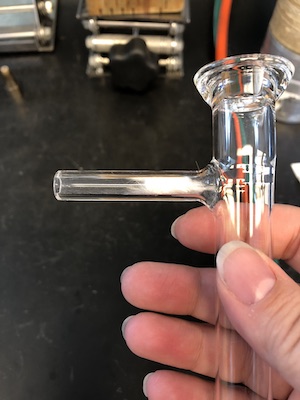
Torch flame used to seal pyrex tubes
Turn the natural gas on first and use a striker to ignite the gas. Adjust the flame until it is about 6 " long. Slowly turn the oxygen on until you have a nice tight immobile blue cone at the tip of the torch (shown in photo with red arrow). The tip of this cone is the hottest part of the flame. After your CO2 is completely frozen in the 6 mm pyrex tube and both V9 and V10 are closed, begin heating the pyrex tube about 2 cm below the ultra-torr with the flame oriented perpendicular to the pyrex tube and using a colder part of the flame. That is, DON'T use the hottest part of the flame. After a few seconds, switch the orientation of the torch so that you are heating the opposite side of the tube with the flame still oriented perpendicular to the tube. Switch again after a few seconds. Keep repeating. The pyrex will eventually cave in. Start moving the flame closer to the tube. As soon as you see the melted portion begin to elongate, support the tube with your other hand and as you allow the tube to lower in the liquid nitrogen, follow the sample side of the tube with the torch to end up with a nice tidy tip. If you hear a pop while sealing, the melted pyrex probably imploded contaminating your sample with atmospheric air.
LEAVE THE TUBE IN THE LIQUID NITROGEN until the tip is room temperature. If you remove the tube from the liquid nitrogen, your CO2 sample will sublimate and begin interacting with the hot pyrex, reseting the Δ47 to an alternative temperature.
Adding More Samples During a Run
You may easily add more samples to the carousel, or replace samples already in the carousel, while you are running the prepline. The best time to open up the autosampler is immediately after a sample has finished digesting in the acid. V1 is open only during an acid reaction. The reaction is complete when V1 has closed. The script will automatically open V2 after a reaction so as to keep the carousel and acid under active vacuum. You must, then, manually close V2. To ensure V2 does not open while you are adding samples, turn on the "Glass line in Use" button. The "Glass line in Use" button prevents V2 from being opened by the script. The safest practice is to click the "Glass line in Use" button and then close V2. Now you can proceed with loading samples as described above. Within the larger subtitle "LOADING SAMPLES" complete ONLY "Vent Autosampler", "Load Samples", and "Evacuate carousel". When you are finished, turn "Glass line in Use" off and V2 should remain OPEN.
Leaving Line Dormant Between Samples
You may wish to stop preparing samples temporarily during the day for a number of reasons. Do not put the line in overnight bakeout because that is a six hour commitment. If you are leaving the line after a sample prep is complete for under one hour, simply top off T0 and leave. If you are leaving for more than 1 hour, top off T0, turn on manual, make sure V15 and V16 are closed, open V13, V14, V0, V10a, V3, V5, V9, V7, and V2. Someday I will make a button for this. Wait for G1 to drop below 5 mTorr. Then, in this order open V16, close V13 and V14, open V15.
When you are ready to start back up again, close V15 and V16, then close V10a, V9, V8, V7, V5, V3, and V2. Then click your next sample (e.g. "Carbonate").
End of Day Routine
When you are finished running your samples for the day, it is important to put the prep line in overnight bakeout mode. This will set labview in motion to heat up various parts of the prep line, bake out the porapak under helium flow, and continue pumping on high vac until someone arrives to run samples. It is important to do all of these steps IN THIS ORDER. In particular, the T0 dewar should not be dropped until Overnight bakeout is ON. If you thaw the T0 trap preemptively, you risk flooding the prep line with water.
You should have finished your last sample by taking the yield, freezing, etc. as normal
You also should have clicked the "Break Seal" button to get the tube initially pumped out.
It is also important to have taken the last water yield measurement as is normal for all samples.
Click the 'Start between-sample bake' button. Wait 2 minutes for the water to be pumped out of T2. Use the TimeRemaining and green progress bar to time the 2 minutes.
If you turned 'Manual' ON for any reason, turn it OFF now.
Turn 'Start up prep line' OFF.
Turn 'Overnight Bakeout' ON.
Type in the duration of the bakeout in hours. The default is 6 hours. You should set this to be the amount of time between now and when you or the next person will arrive to run the line next. If no one will be running tomorrow, set the bakeout time to 24 hours.
Drop the T0 dewar - DON'T DO THIS STEP UNTIL YOU HAVE DONE STEP 7.
Consider loading new acid (See “Loading New Acid” section below for more details).
Make sure MV12 is open.
Turn off torch oxygen and natural gas.
Put -80 °C ethanol dewars in walk-in freezer.
Pour liquid nitrogen from trap dewars back into larger overnight dewars.
Put foil lid on T3 ethanol dewar.
Loading New Acid
Choosing to replace the acid - The choice to replace the acid is somewhat arbitrary. If you ran dirty, low-carbonate samples all day, you may wish to change the acid after only this single day because of all the sediment. Alternatively, if the line has only seen pure carbonate samples for a week, you may wish to change the acid because there are so many capsules spinning around. Perhaps the acid looks fine, but the neck and side arm are covered with sample material and you think this is enough of a reason to change everything out. Perhaps the acid is ready to change but the top glass piece is fine and you choose to only change the bottom piece. Whatever the case, ideally, you are changing the acid at the end of a day to allow it to heat up and pump out overnight.
Replacing the acid -
Make sure V2 is closed and vent the autosampler.
Turn the stir bar down to very low or off.
Remove the clip holding the lower acid vessel and the upper drop-tube together.
Lower the lab jack with the heat / stir plate and slide the entire assembly away from the acid vessel. Make sure you grab the o-ring.
While holding the insulation to the heat / stir plate, grab the glass neck of the acid vessel and pull up to free it from the insulation.
Use a stir bar wand to remove the stir bar from the acid and place the wand and stir bar into a white tub of soapy water.
Take the old acid to the hood in the mass spec lab (302A) and dump it into the Phosphoric Acid Waste container.
The waste container is located under the hood in the "Corrosives" cabinet.
We typically use old Phosphorus pentoxide jars.
If you do not see an existing waste container, look for an empty Phosphorus pentoxide jar.
If you are using a new waste phosphorus pentoxide jar (i.e. residual dry phosphorus pentoxide), then expect sizzling and steam when you pour wet acid waste in the jar for the first time. This happens because of the heat generated when phosphorus pentoxide reacts with water. This is ok. BUT, leave the jar in the hood with the lid OFF until it has cooled down.
You do not need to leave the lid off if you are using an existing waste container.
Fill with a similar volume of tap water, swirl around, dump this into the waste container as well.
CLEAN UP - Return the waste container to the Corrosives cabinet. Use Green soap spray and paper towels to wipe up any minor spilled acid. This paper towel can go in the trash
Put the used acid vessel into the same white tub of soapy water and make sure all the air is out of the vessel so it can soak properly.
Consider changing the drop tube. If it looks visibly dirty with sample powder and acid, change it, otherwise, you can leave it in place.
Changing the drop tube (BE CAREFUL):
Loosen the ultra-torr one half turn and leave the drop tube side arm inside the ulta-torr.
Loosen the upper autosampler fitting by holding one hand below the fitting so it does not fall onto the side arm and the other hand loosens the top knurled nut.
When the autosampler is completely free, raise the autosampler very slightly until you can rotate the drop tube glass piece about the ultra-torr. Rotate it so the top of the drop tube moves away from you.
Once it is free from the autosampler area, pull the glass side-arm out of the ultra-torr.
Wipe and re-grease all three o-rings (1 between the two glass pieces, 1 in the ultra-torr, 1 at the autosampler).
Grab clean glassware from the cabinet below the prepline computer in a box labelled with clean acid glassware and remove the foil.
Fresh acid is in the corrosion resistant drying oven that is next to the muffle furnace in 303B (prepline room). The appropriate Phosphoric Acid is in a bottle that is labeled with the date it was made and the specific gravity. DO NOT USE 85% phosphoric acid that is stored in 302A with waste!!!
Side arm of drop tube with glass wool in position. In a fume hood, fill the vessel with the appropriate amount of Phosphoric Acid ~1-1.5 cm depth (specific gravity 1.90 – 1.95).
The appropriate amount of acid will fill the wide part of the acid vessel 1/4 to 1/3. NOT more than 1/3 and certainly not 1/2.
Slide a stir bar into the acid vessel.
Place the acid vessel into the insulation on the heat / stir plate. You will position more carefully after it's attached to the drop tube.
Away from the freshly greased o-rings, stuff a small amount of GLASS wool (not quartz wool) into the side arm of the drop tube glass piece. This is best started with tweezers but then finished with one of the weighing tools that can pack the glass wool deeper into the side arm, so that the glass wool ends up close to the joint with the drop tube. Also, when the wool is just inside the side arm, cut the wispy bits off and then continue pushing the wool in. Wipe the entire piece off as well as your hands in an attempt to get all the glass wool contained. If a single filament is left on the outside of the arm, it will cause a leak.
Reattach the upper drop tube glass piece doing the above steps in reverse order. BE CAREFUL.
Slide the heat / stir plate with insulation and acid vessel to be directly under the drop tube.
Position the o-ring, lift the acid vessel (leaving the insulation and lab jack where they are) so you can clamp the two glass pieces together. Here you are lifting the acid vessel to meet the drop tube but you are NOT raising the lab jack.
Now raise the insulation so you can see how to adjust the lab jack so that the base of the heat / stir plate is flush with the bottom of the vessel and the vessel is centered on the stir plate.
Position the lab jack / hot plate such that the stir bar inside the acid vessel is NOT centered but rather, to one side just slightly touching the side of the acid vessel.
turn the stir velocity up to 1000 - 1200 rpm and make sure the stir bar remains synchronized with the stir plate. It can easily become out of sync and no longer stir the acid properly
(Load samples now if you are about to run).
Open V2 and wait for G5 to pump down.
Turn heat setting to such that the acid temperature is between 88.5 and 91.5 °C (depending on acid vessel placement the value on the hot plate may be about 150, but really, you should use the acid temperature, not the value on the hot plate).
Once the acid is up to temperature, check the stir bar one last time. see how
Making new acid - If you notice the acid bottle is less than half full and all other bottles are empty, it's time to make more. See the Making Phosphoric Acid method.
Troubleshooting
Low Yield for unknown samples - If you didn't know the percent carbonate ahead of time and run a sample blindly, you risk obtaining a yield too low to run on the mass spec. This yield value, however, is still useful to calculate the percent carbonate and hence, the new target weight for that sample. As of 150106, the equation to do this is:
target sample mass (mg) = [8 mg pure carbonate] / ((( [CO2gauge2mbar] - preplineyieldfit(2)) / preplineyieldfit(1)) / [initial sample mass (mg)] )
Replace values within [] with actual numbers. You have [CO2gauge2mbar] and [initial sample mass (mg)] from your low-yield prep while [8 mg pure carbonate] is simply our current target of 8 (mg pure carbonate). preplineyieldfit(2) and preplineyieldfit(1) will be available after you run pollycompile with matlab. They are the slope (preplineyieldfit(1)) and intercept (preplineyieldfit(2)) of the gauge 2 yield vs the sample mass for all carbonate standards. These data and this line are shown in a figure (currently figure 21) after pollycompile is executed.
Autosampler carousel has acid on it - If you flood the autosampler with acid or if acid has gradually built up from splashing, remove the carousel, take the three screws out from the bottom plate and soak the three pieces in soapy water. Wash and scrub as needed. Rinse with DI. Allow to dry in drying oven. Reassemble.
Vacuum gauge will not drop below threshold - Is it possible that you allowed the vacuum pump to pull room air for 30 seconds or more? If yes, the pump may take many hours before it is able to reach a low vacuum again. If you don't recall or you are certain you did not allow the pump to pull room air for an extended period of time, the pump may be ready for maintenance. It is also possible that the gauge is in need of calibration. The best course of action is to stop here, allow the line to bake out overnight, and check the gauge again in the morning.
Start over - If you find that you wish to start over, press 'Force between sample bake'. This will take a while to complete because the line must now go through a between-sample-bake cycle. The time varies depending on what step you were on when you click this button. If you simply wish to quit and start over tomorrow, make sure Manual is OFF, then turn 'Start up prep line' OFF, and turn 'Overnight Bakeout' ON. See you tomorrow.
My sample is stuck - Your sample may become stuck in two different locations.
In the autosampler
DO NOT ADVANCE THE AUTOSAMPLER AGAIN.
Try lightly tapping with the soft rubber coated sides of the pliers (aka spanner).
If tapping is not working, try the jog switch (see Carousel alignment above).
If all you can not dislodge it, press 'Force between sample bake', make sure V1 and V2 are closed, open the autosampler, dislodge your sample trying not drop it into the acid, follow instructions for 'ADDING MORE SAMPLES DURING A RUN' above.
On the sides of drop tube or acid vessel
press 'Force between sample bake', make sure V1 and V2 are closed, and go through the 'LOADING NEW ACID' procedure above.
Torch does not light or goes out
Make sure you turned both the natural gas over by the hood and the oxygen cylinder ON.
Make sure the torch control knobs are not open too much.
If the oxygen cylinder is indeed ON and the right pressure gauge is reading zero psi, you are out of O2 and a new O2 cylinder is needed.
Labview crashed - For whatever reason, labview shows an error message and the interface no longer is running such that valves etc. are being controlled. Close labview. See 'Labview Software' section at top of this document.
Unexpected behavior with automated line
Take a screen capture of labview window by ensuring labview is the window you are looking at, open “Snipping Tool” from Desktop or Taskbar, click the arrow next to “New”, select “Full-screen Snip”, save as yymmdd into C:\PrepLine\ScreenShots\.
Make note of G2 pressure.
Make note of High Vacuum pressure gauge and Turbo pump speed (number of LEDs on / off).
Try to make as many other notes as you can, including what you had done prior to this event.
If you want to continue running today, you can try starting the line over by turning 'Start up prepline' off and then on or by clicking 'force between sample bake'.
Suggested Reading
Brand WA, Assonov SS, Coplen TB. (2010) Correction for the 17O interference in δ(13C) measurements when analyzing CO2 with stable isotope mass spectrometry. Pure and Applied Chemistry, 82. doi: 10.1351/PAC-REP-09-01-05.
Daëron M, Blamart D, Peral M, Affek HP. (2016) Absolute isotopic abundance ratios and the accuracy of Δ47 measurements. Chemical Geology 442, 83. doi: 10.1016/j.chemgeo.2016.08.014.
Eiler JM, Schauble E. (2004) 18O13C16O in Earth’s atmosphere. Geochimica et Cosmochimica Acta 68, 4767-4777. doi: 10.1016/j.gca.2004.05.035.
Dennis KJ, Affek HP, Passey BH, Schrag DP, Eiler JM. (2011) Defining an absolute reference frame for ‘clumped’ isotope studies of CO2. Geochimica et Cosmochimica Acta 75, 7117-7131. doi: 10.1016/j.gca.2011.09.025.
He B, Olack GA, Colman AS. (2012) Pressure baseline correction and high-precision CO2 clumped-isotope (Δ47) measurements in bellows and micro-volume modes. Rapid Communications in Mass Spectrometry 26, 2837-2853. doi: 10.1002/rcm.6436.
Huntington KW, Eiler JM, Affek HP, Guo W, Bonifacie M, Yeung LY, Thiagarajan N, Passey B, Tripati A, Daëron M, Came R. (2009) Methods and limitations of ‘clumped’ CO2 isotope (Δ47) analysis by gas-source isotope ratio mass spectrometry. Journal of Mass Spectrometry 44, 1318-1329. doi: 10.1002/jms.1614.
Kelson JR, Huntington KW, Schauer AJ, Saenger C, Lechler AR. (2009) Toward a universal carbonate clumped isotope calibration: Diverse synthesis and preparatory methods suggest a single temperature relationship. Geochimica et Cosmochimica Acta 197. doi: 10.1016/j.gca.2016.10.010.
Petersen SV, Defliese WF, Saenger C, Daëron M, John CM, Huntington KW, Kelson JR, Bernasconi SM, Colman AS, Kluge T, Olack GA, Schauer AJ, Bajnai D, Bonifacie M, Breitenbach SFM, Fiebig J, Fernandez AB, Henkes GA, Hodell D, Katz A, Kele S, Lohmann KC, Passey BH, Peral M, Petrizzo DA, Rosenheim BE, Tripati A, Venturelli R, Young ED, Wacker U and Winkelstern IZ (2019) Effects of improved 17O correction on interlaboratory agreement in clumped isotope calibrations, estimates of mineral‐specific offsets, and temperature dependence of acid digestion fractionation. Geochemistry, Geophysics, Geosystems 20, 3495–3519. doi: 10.1029/2018GC008127.
Santrock J, Studley SA, Hayes JM. Isotopic analyses based on the mass spectra of carbon dioxide. Analytical Chemistry 57, 1444–1448. (1985) doi: 10.1021/ac00284a060.
Schauer AJ, Kelson J, Saenger C, Huntington KW. (2016) Choice of 17O correction affects clumped isotope (Δ47) values of CO2 measured with mass spectrometry. Rapid Communications in Mass Spectrometry 30, 2607–2616 doi: 10.1002/rcm.7743.
Wang Z, Schauble EA, Eiler JM. (2004) Equilibrium thermodynamics of multiply substituted isotopologues of molecular gases. Geochimica et Cosmochimica Acta 68, 4779-4797. doi: 10.1016/j.gca.2004.05.039