
Carbonate Bulk Isotope Analysis
Introduction
We use a Kiel III Carbonate Device coupled to a Finnigan Delta Plus (aka Boris) isotope ratio mass spectrometer (IRMS) for a dual-inlet based δ13C and δ18O measurement of small carbonate samples. The Kiel III Carbonate Device is an automated system that digests carbonate containing material with phosphoric acid. The desired product, CO2, is purified, and passed to the IRMS for bulk carbon and oxygen isotope analysis. We employ carbonate international reference materials NBS19, NBS18, L-SVEC, and IAEA-603 to place our δ13C and δ18O values on the VPDB scale. We have a suite of internal reference materials (named C1, C2, CQS2) that span the same range as NBS19, NBS18, L-SVEC, and IAEA-603 for day to day analyses. You can see accepted values for these carbonates on the reference material page.
Safety
Appropriate precautions should be taken to protect yourself against the cold temperatures, phosphoric acid, and reasonably warm temperatures associated with this method. Wear safety glasses and leather gloves when handling liquid nitrogen. Wear nitrile gloves and safety glasses when changing the phosphoric acid. Refill acid from stock container to vessel in a chemical fume hood. Users are expected to know the contents of the MSDS for phosphoric acid. Leather gloves should be worn when handling the magazine from the oven.
Terse Procedure
- Weigh samples and standards
- Assess current state of instrument
- Drop blue liquid nitrogen dewar
- Adjust change-over valves (31 - 34) for backgrounds
- Remove old sample vessels
- Load new samples
- Daily log
- Prepare liquid nitrogen
- Sequence table
- Start run
- Clean up
- Data reduction
Exhaustive Protocol 
Weigh Samples and Standards
| Magazine | Line | Contents |
|---|---|---|
| 1 | empty vial | |
| 2 | empty vial | |
| 3 | 1 | cndtnr |
| 4 | 2 | C1 |
| 5 | 3 | C2 |
| 6 | 4 | CQS2 |
| 7 | 5 | sample |
| 8 | 6 | sample |
| 9 | 7 | sample |
| 10 | 8 | sample |
| 11 | 9 | sample |
| 12 | 10 | sample |
| 13 | 11 | sample |
| 14 | 12 | C2 |
| 15 | 13 | C1 |
| 16 | 14 | CQS2 |
| 17 | 15 | sample |
| 18 | 16 | sample |
| 19 | 17 | sample |
| 20 | 18 | sample |
| 21 | 19 | sample |
| 22 | 20 | sample |
| 23 | 21 | sample |
| 24 | 22 | sample |
| 25 | 23 | CQS2 | 26 | 24 | C1 |
| 27 | 25 | C2 |
| 28 | 26 | sample |
| 29 | 27 | sample |
| 30 | 28 | sample |
| 31 | 29 | sample |
| 32 | 30 | sample |
| 33 | 31 | sample |
| 34 | 32 | sample |
| 35 | 33 | sample |
| 36 | 34 | C1 |
| 37 | 35 | CQS2 |
| 38 | 36 | C2 |
| 39 | 37 | sample |
| 40 | 38 | sample |
| 41 | 39 | sample |
| 42 | 40 | sample |
| 43 | 41 | sample |
| 44 | 42 | sample |
| 45 | 43 | sample |
| 46 | 44 | CQS2 |
| 47 | 45 | C1 |
| 48 | 46 | C2 |
- Using one of the micro balances in room 303B, weigh your samples to 20 - 120 μg (0.02 - 0.12 mg) of carbonate. Consult the microbalance method. It's best to try to hit 100 µg. If your samples are not pure carbonate, you need a rough estimate of how much carbonate they do have so that you can weigh out the appropriate amount of material. See the Percent Carbonate method for one way to do this. You can also keep going with this method and weigh standards appropriately (see below) so you obtain percent carbonate data using the Kiel.
- Use a Kiel rack to hold your vessels containing weighed material while weighing. They are stainless steel racks numbered like magazines, there are four of them, and they are stored on top of the Kiel.
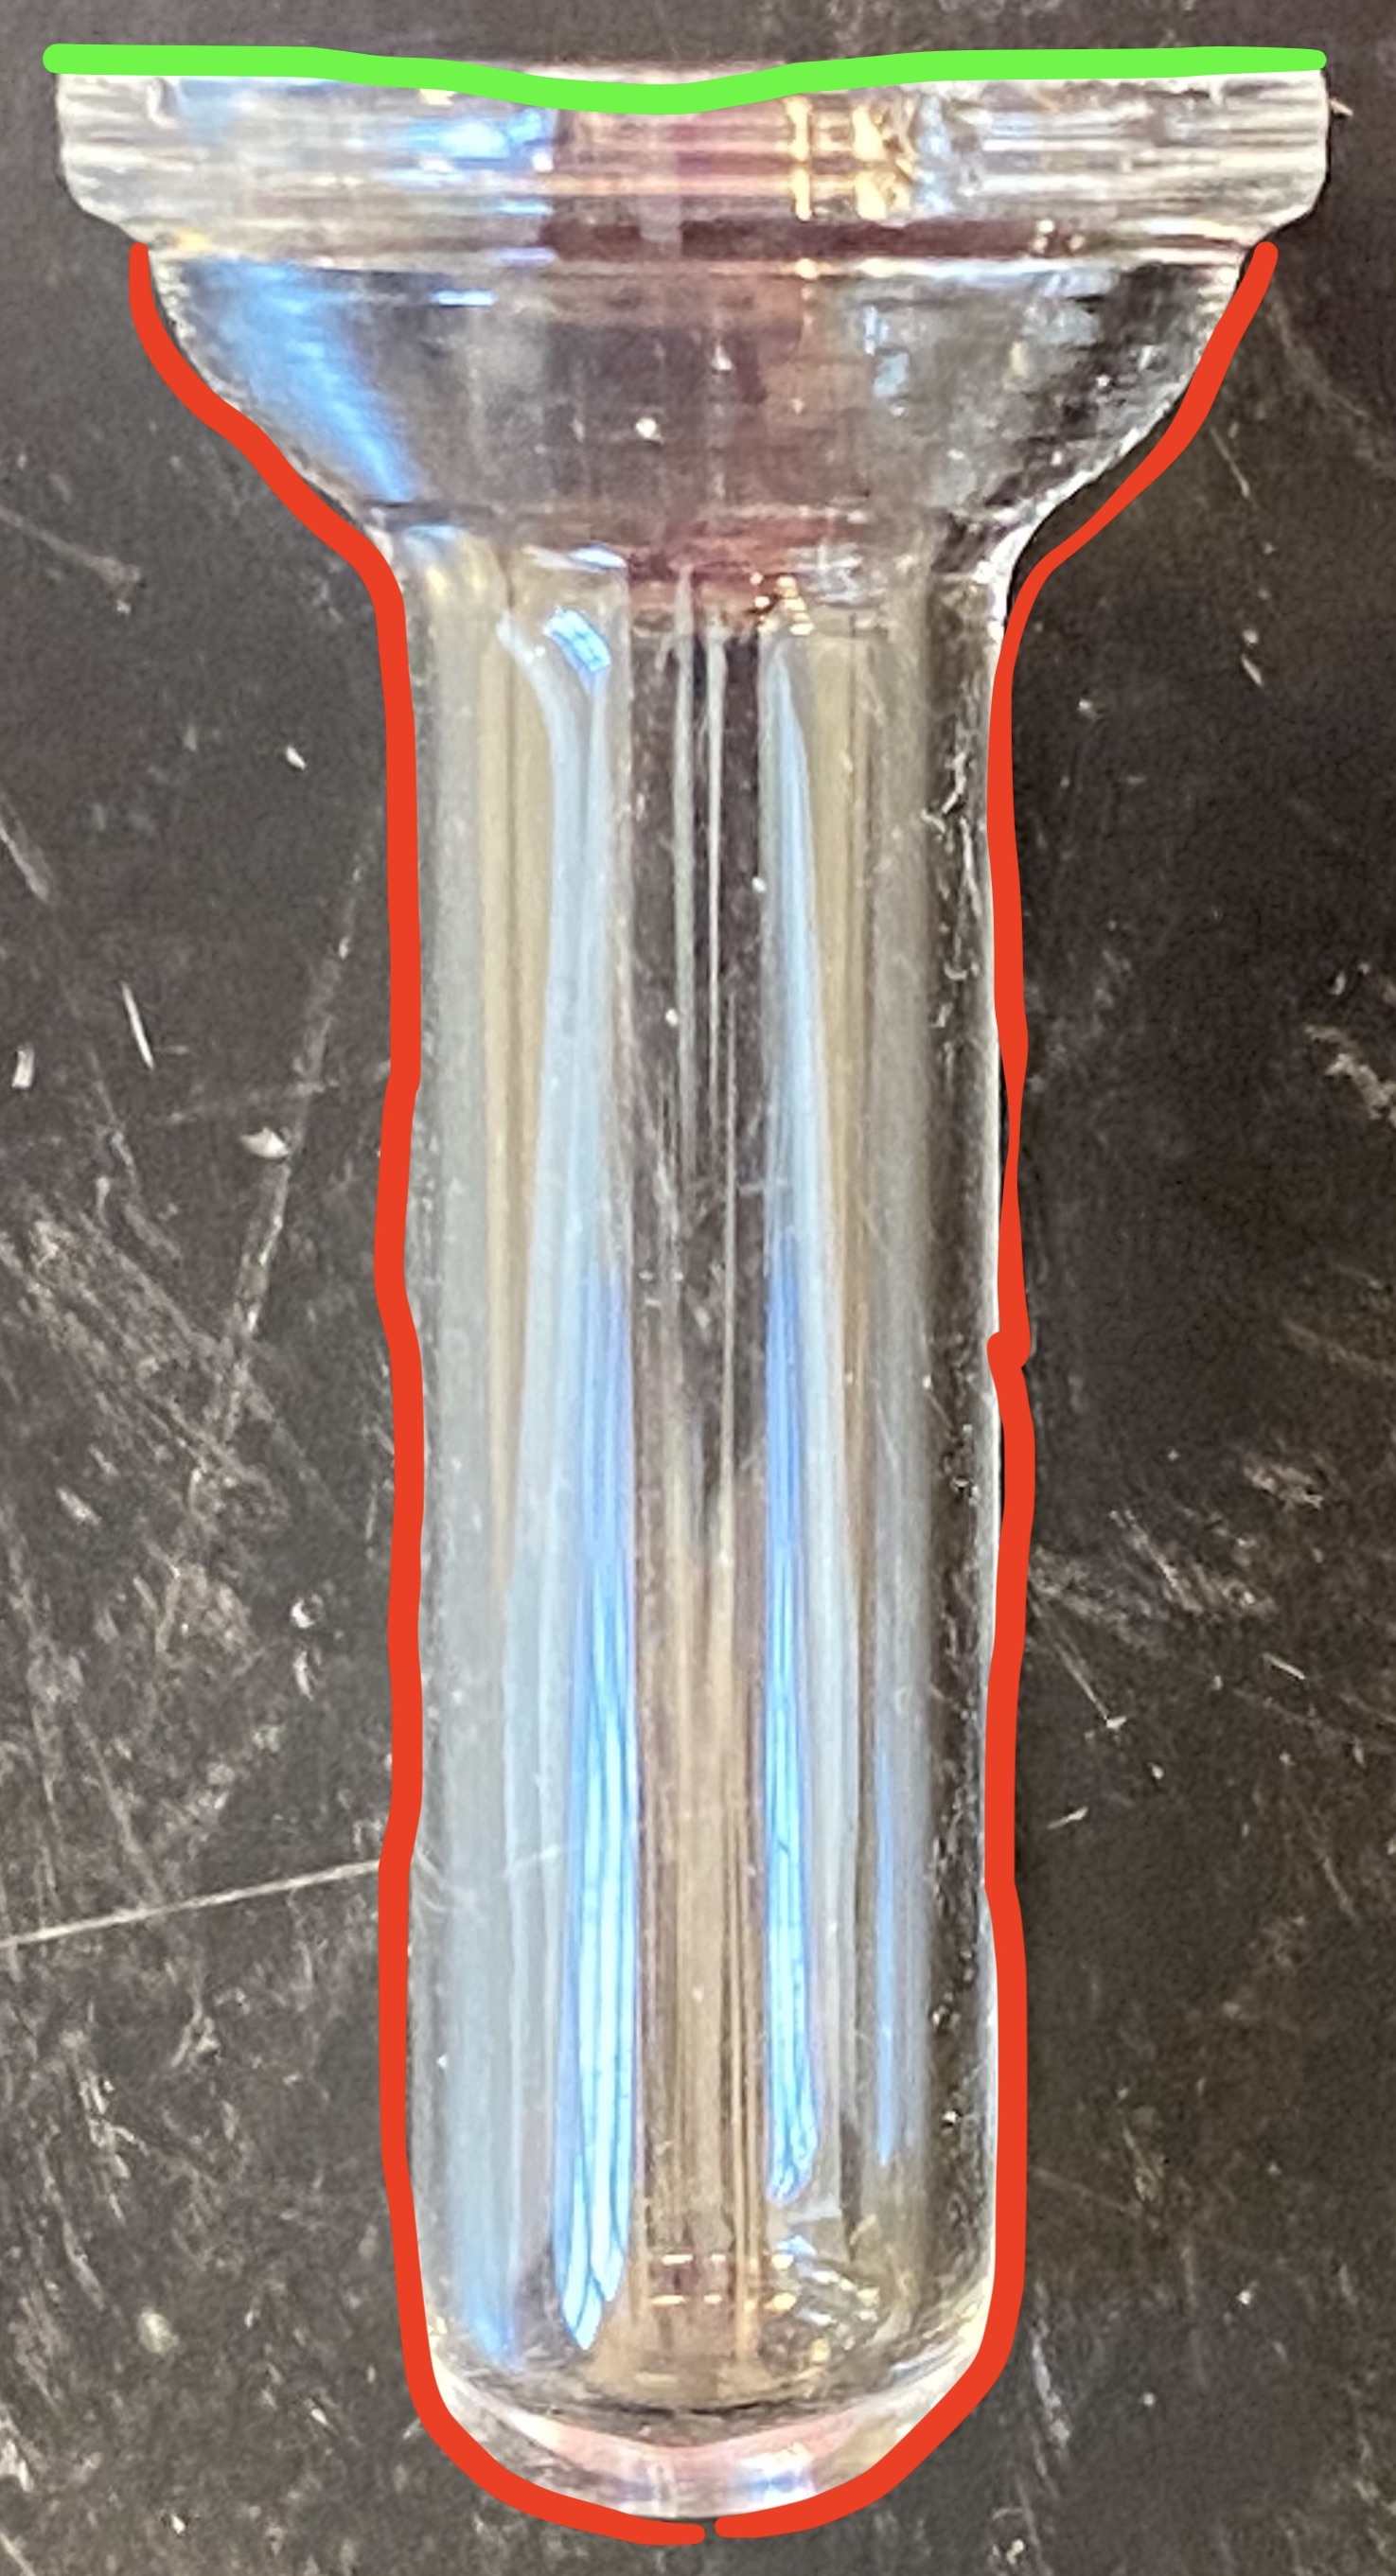
- Inspect each vessel for cleanliness and for cracks . If a vessel is dirty see that it gets washed. If a vessel is cracked through at the bottom or along the sealing edge, throw it in the laboratory glass box.
- Place an empty, clean vessel in each of the first two, unnumbered, positions on the rack.
- Use the carbonate standards C1, C2, and CQS2 that are stored in the desiccator. Note, each standard has replicate vials indicated with a letter (e.g. C1a). C1 ≡ C1a ≡ C1b ≡ C1c etc.
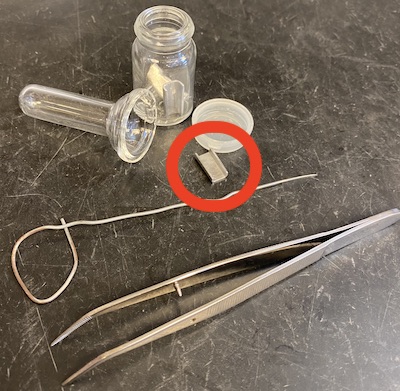
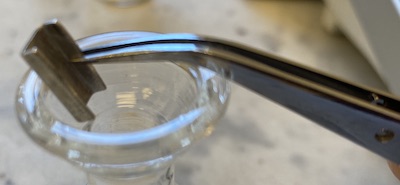
- Find appropriate weighing tools shown in photo. Clean the weigh boat with a swab or wipe. Clean the utensil and forceps with a wipe. You will want to clean each tool before working with a new material (e.g. when switching from weighing C1 to C2). Place weigh boat on the balance and zero the balance. Use the utensil to carefully drop the tiny amount onto the weigh boat. Record the weight. Use the forceps to move the weigh boat above a clean vessel and slowly hit the weigh boat against the side so that the material slides into the vessel. Try not to drop the weigh boat into the vessel.
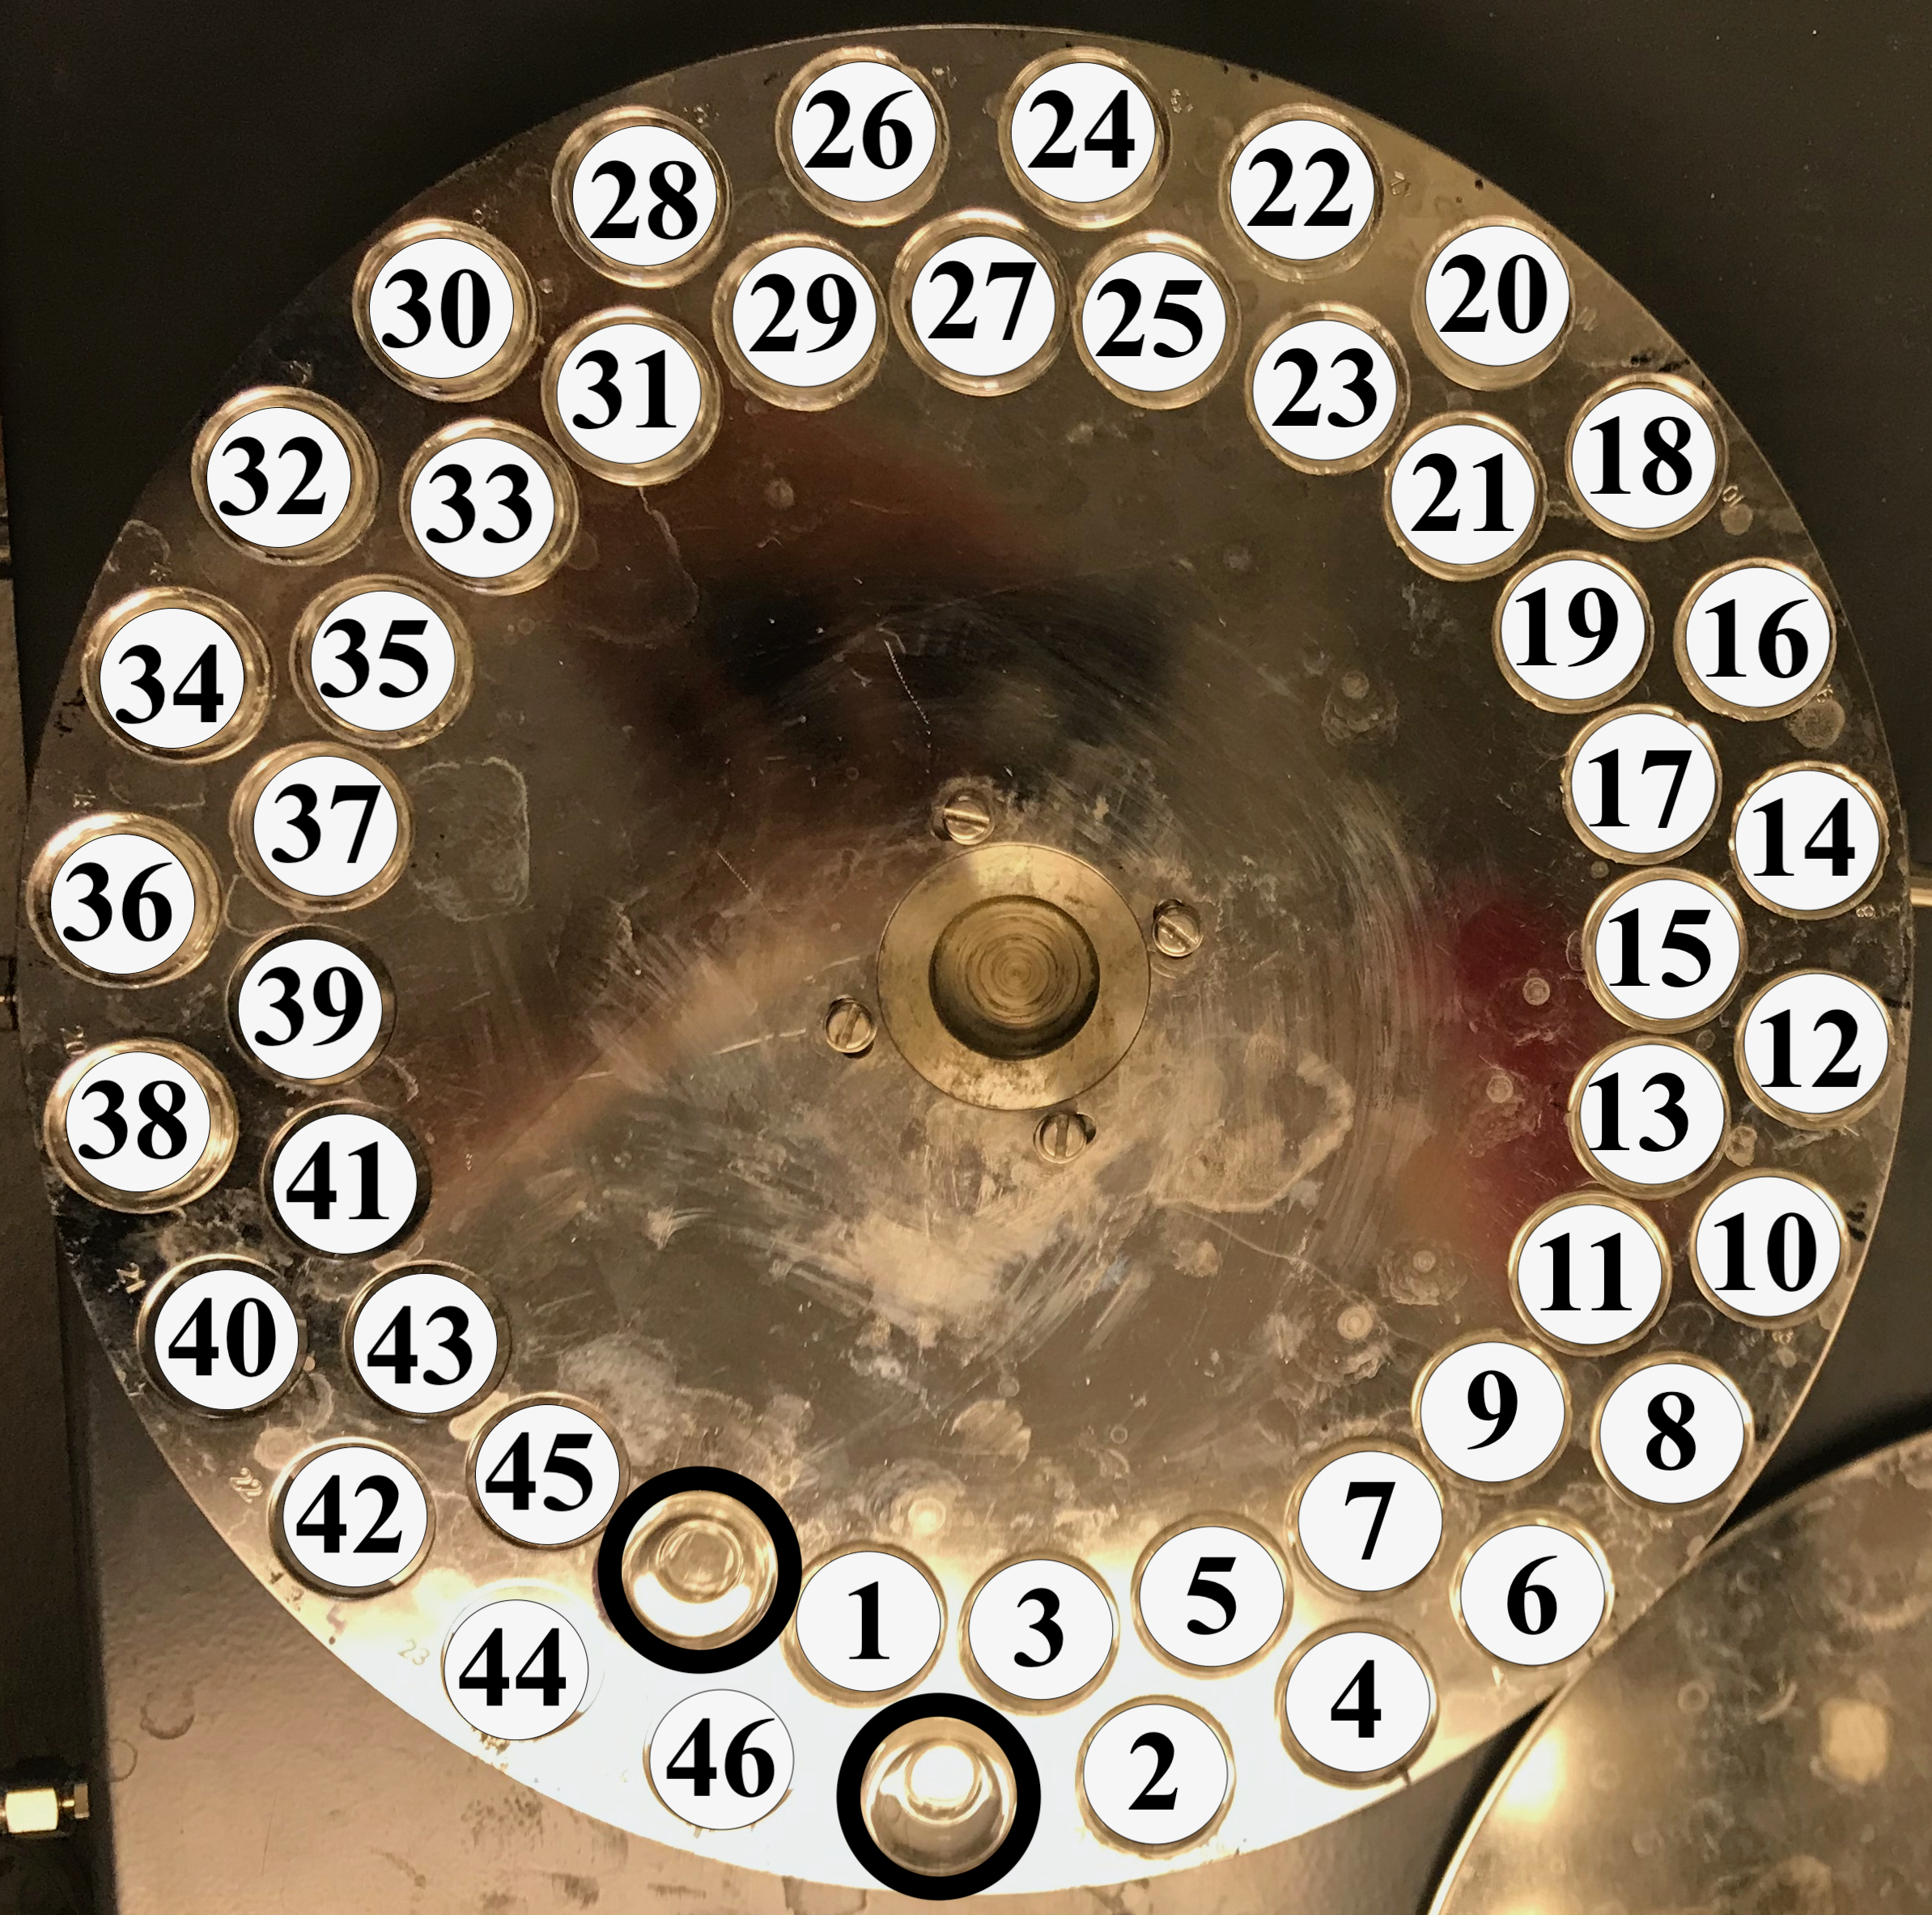
- Your run should be structured like the "Suggested Run Structure" table. Magazine is the name of the carousel inserted into the Kiel and, in this case, is simply an increasing number referring to the number of vials possible. Line is the useful vial number and is used in the Isodat sequence table below. Note: the order of standards is randomized (or at least, not systematic) intentionally. "cndtnr" is a C1 that is called "cndtnr". If you want to know percent carbonate as well, run 5 to 10 "qtycal_C1" standards in Line position 1 and scatter about the rest of the tray. qtycal_C1 is simply the C1 standard weighed such that you have an even spread from 0.01 to 0.12 mg in no particular order. Also, if you are including qtycal_C1, consider removing one set of standards (one set of C1, C2, CQS2) so you have four sets instead of five.
- You don't have to run a full tray of samples. If you have fewer samples make sure you have at least three sets of isotope standards and five-ish qtycal standards (if you include those), and then you will have empty spots at the end of the run. You will then need to highlight only those rows in the sequence table that have vials.
- Keep the rack and vessels covered with the metal lid as you weigh.
- Place the covered rack and vessels in one of the long desiccators until you can load your samples into the Kiel.
Note: samples of dolomite and siderite require additional time to run.
Current Instrument State
The instrument might be in one of four states: Running, Finished with Previous Run, Standby and Drop, or Crashed. Look in the "Info" box at the bottom of the screen in the "Isodat Acquisition" software. This is a running log of what the instrument is doing. If it is still running you should see a relatively recent entry. If the instrument has stopped running because it is finished or crashed, you should see a red dot with a white X indicating it has stopped. If you think the run finished, you should look in the Results tab in the File Browser bar to make sure a file with data exists for every sample and standard in the sequence of the previous run. Look at the magazine and make sure it's in position 1 and that all vessels have acid and not unreacted sample material. If it has not finished and it doesn’t appear to be running, it has crashed; go to the troubleshooting section below.
If the instrument appears to be in “Standby and Drop” mode, you can stop this by going to the “ISL Scripts” bar on the left side of the screen. Highlight the “StandbyAndDrop.isl” and click “Terminate Script”. To put it back in Standby and Drop mode, should you wish to, make sure at least the first FOUR vessels are in place and without sample, right click in the gray space of the Carbonate Device bar and select “Standby and Drop”.
Prepare Instrument
Thaw sample traps - Drop the liquid nitrogen dewar to allow the traps to thaw and drip dry. Do this carefully as the traps and refill parts are delicate. In the “Carbonate Device” window, set both trap temperatures to +150 °C.
Dual inlet - In the “Dual Inlet” window, make sure no gas is entering the source by opening valves 32 and 34. This will ensure valves 31 and 33 are closed to the source.
Remove old sample vessels - "Take Magazine" by right clicking in the "Carbonate Device" window on a gray open area of the diagram and then click on "Take Magazine". A prompt will indicate line is not free (a vessel is attached), and ask if you wish to continue with disconnect? Click Yes. This will disconnect both vessels. Wait for the prompt to say, "Ready to Take Magazine" and click OK. With leather gloves on, remove the magazine taking care not to bump the acid droppers. Place the magazine on the stand located on the top of Boris. Prepare a soapy water dish pan and place it next to the magazine on Boris. Pull each vial out of the magazine and inspect it to ensure it has acid. If it does not have acid and you see dry sample, the vessel probably leaks. You may wish to save this sample so place it in a rack in the exact position you pulled it from and cover it with foil. Continue until all vessels are removed.
Daily Log
The lab uses a daily log for each instrument or preparation line to allow users a first glance at the readiness of the instrument. By comparing the current state of the instrument to historical states, you are more informed about the instrument and whether or not it is functioning properly and ready to run your samples.
Each daily log is web based and browser accessible. No link is provided here by design. Open the browser on the controlling computer and you should see at least two tabs already open. One tab is this SOP and the other is the daily log. If the browser has more than two tabs open, it may have additional SOPs. Use the bookmark toolbar as needed if tabs have been closed.
Work through each cell of the daily log. If you are uncertain where to find certain information, hover over the column header tip, denoted by a ⓘ symbol.
Make certain to press the 'save to log' button when you are finished entering data.
You are welcome to make notes if you have observed something with or done something to the instrument and would like to document that information. Use the "insert note" link at the top of the daily log to make a note. You may enter notes at any time.
Liquid nitrogen
The large 180 L dewar should be at least half full prior to starting a full magazine of samples. If it is empty or near empty, replace with a fuller 180 L dewar. First, close the valve on the 180 L dewar. Then, use the wrench that should be attached to loosen and remove the hose. LEAVE THE BRASS FITTING ON THE DEWAR. Once the hose is removed, use the cart to move the empty dewar to the hallway and tear off half of the tag to indicate it is empty. If the 180 L dewar is not empty, use the other hose to empty the remaining liquid nitrogen into one of the handheld dewars before placing it in the hallway. Keep the cart in the lab. Next, use the cart to move a nearly full 180 L dewar to the back of the Kiel. Connect the hose to the LIQUID port, not the gas port. Once the hose is secure, open the valve.

The small blue dewar underneath the instrument should be reasonably dry before each run. If a large amount of ice has built up, pour remaining liquid nitrogen into another dewar and remove ice. If the instrument has been dormant and the dewar has liquid water, pour it down a drain. DO NOT POUR LIQUID NITROGEN OR VERY COLD WATER ICE DOWN THE DRAIN.
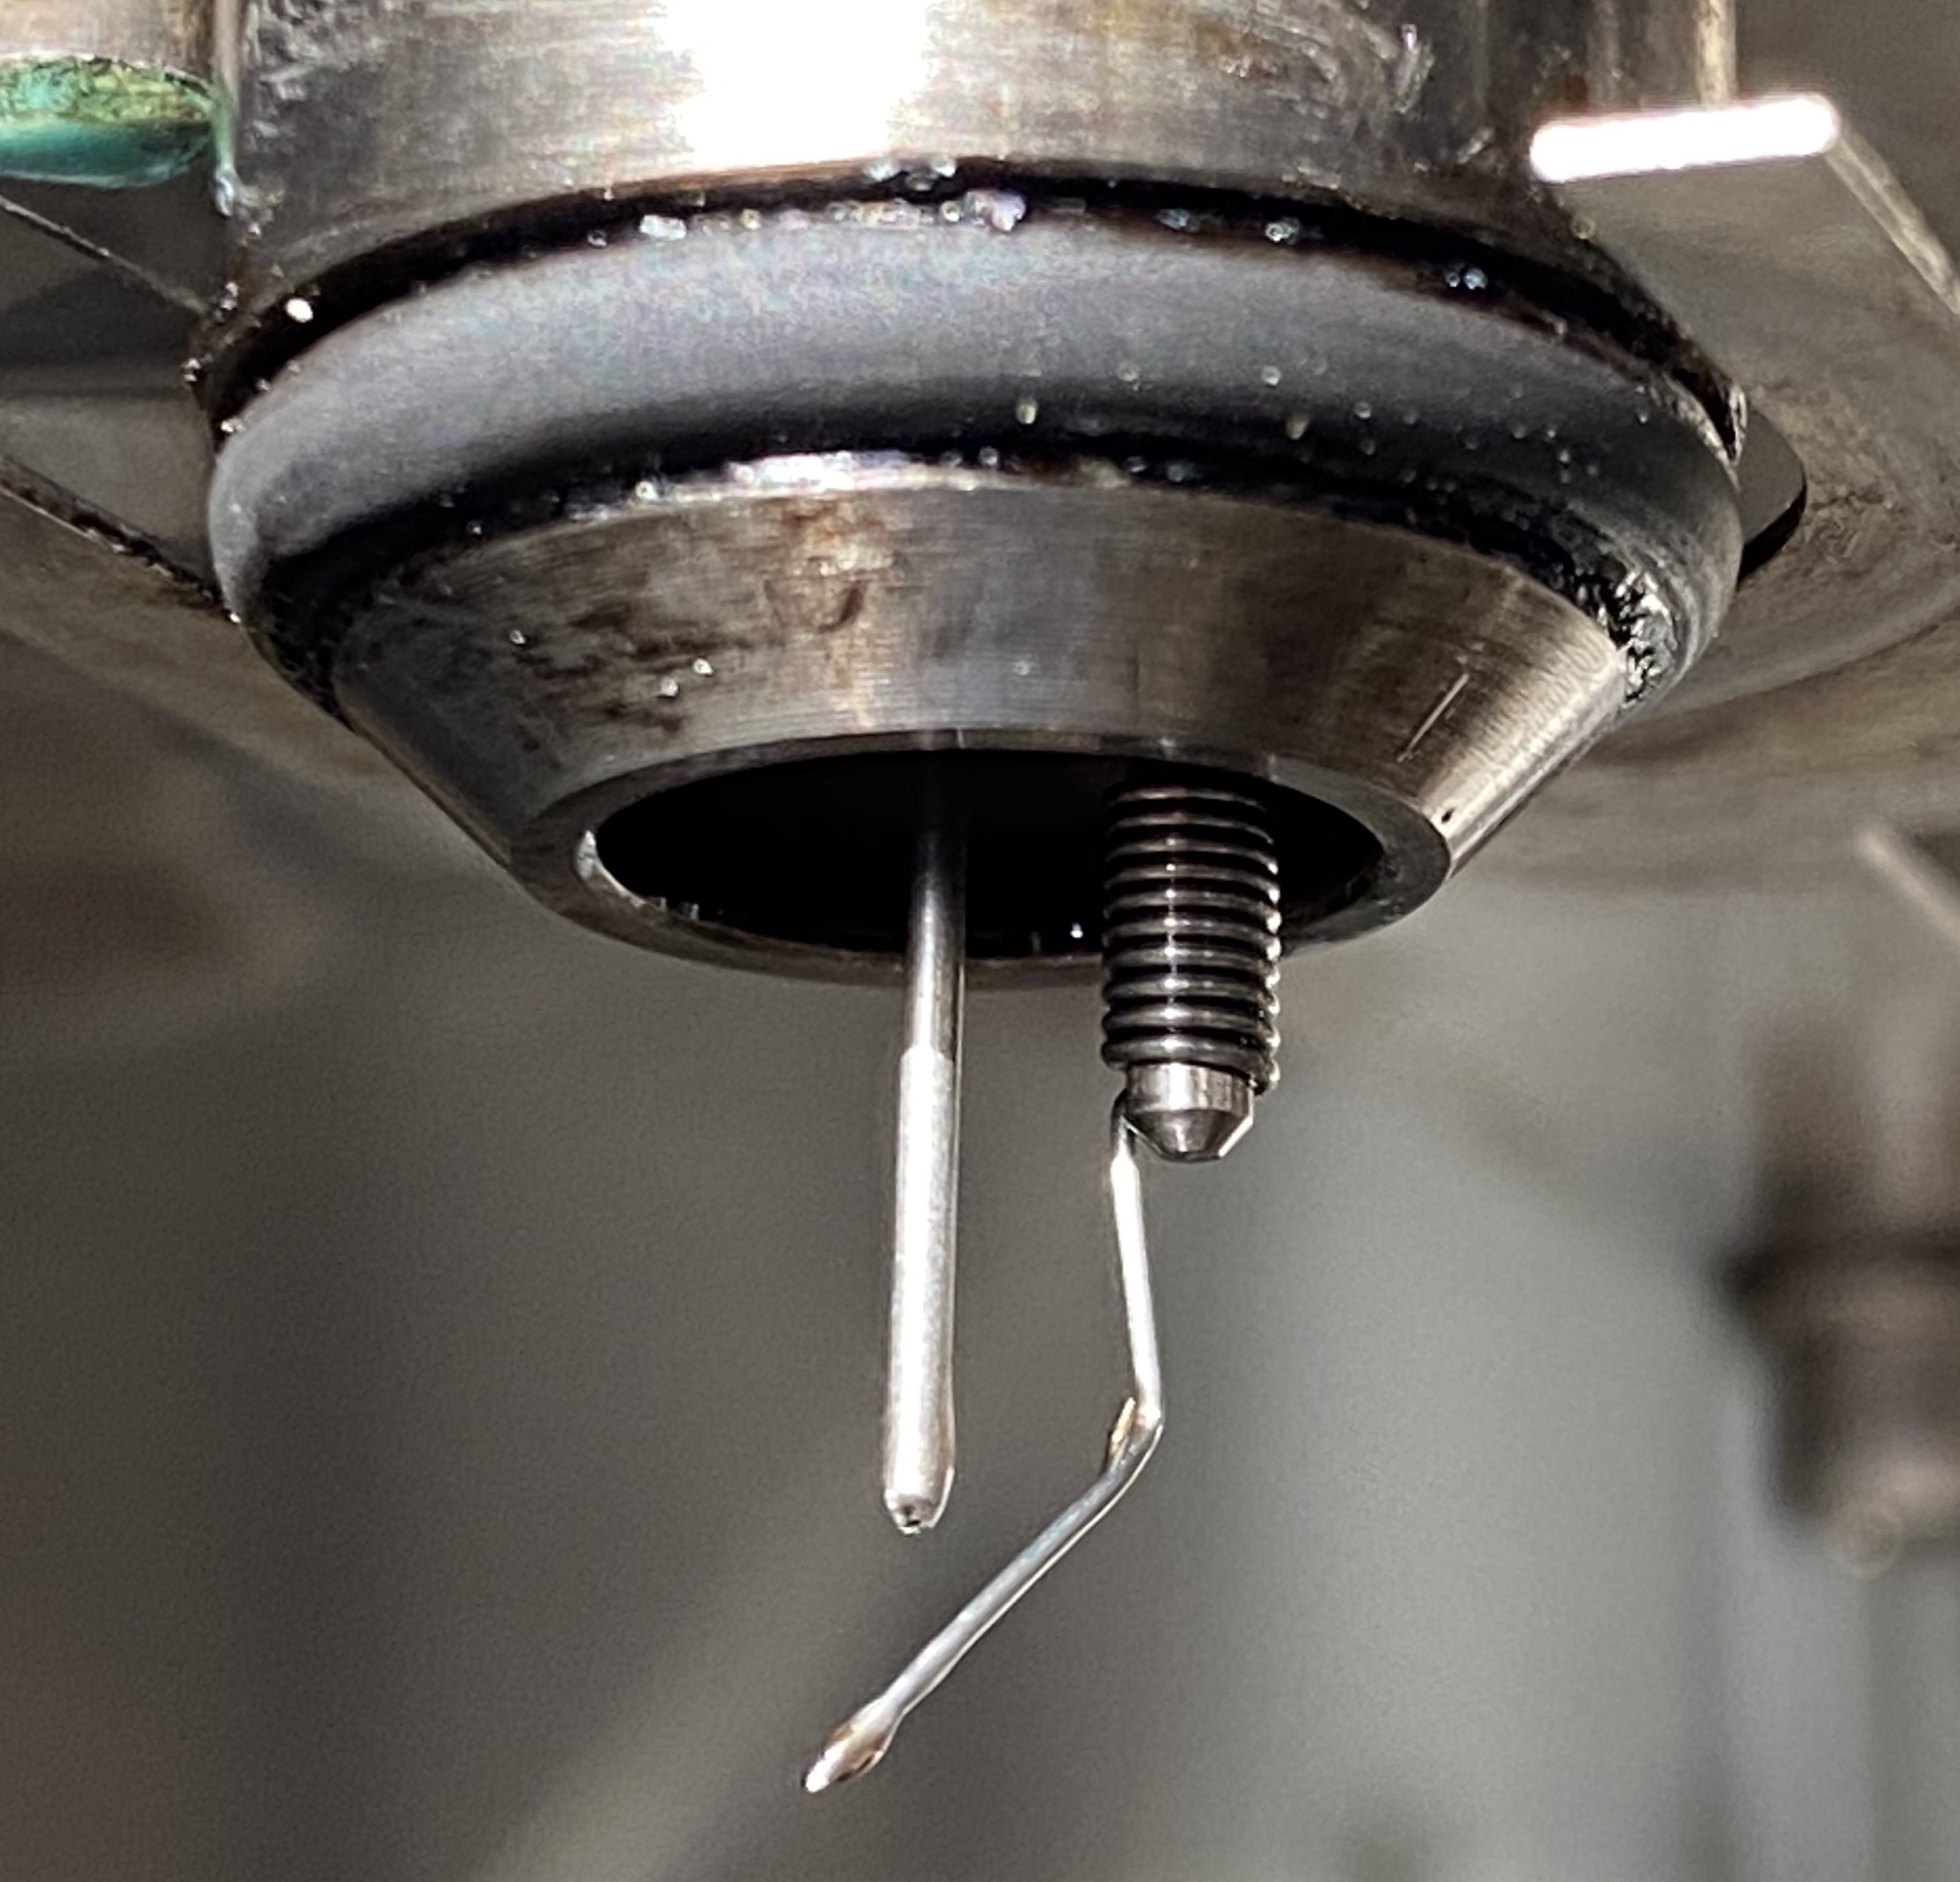
Make certain the liquid nitrogen refill parts that are normally hidden by the blue dewar are dry. Use compressed air to blow all water off liquid nitrogen parts.
Either manually fill a dry liquid nitrogen dewar to within 3 inches of the top and replace the dewar to its native location (top of dewar flush with stainless steel panel) or place said dewar into position and allow it to fill with liquid nitrogen using the kiel plumbing by clicking one of the trap temperature set points and setting it to -200 *C.
Within the “Carbonate Device” window, set both traps to -200 °C. You might hear the liquid nitrogen begin filling and the trap temperatures should begin to fall. While continuing on to the next step, pay attention to the trap temperatures and make sure they actually drop below -160 °C.
Sequence Table
Enter weights in the sequence table - Enter weights in the sequence table - open "Kiel_template.seq" (or the appropriate sequence for your run) from within Isodat Acquisition (located in File Browser, Sequences). Your sample may need a different sequence to run, like dolomite and siderite samples, for example, require more time and additional acid drops than the standard sequence template provides (we have used kiel_template_10drops_80.seq in the past; the method used by this sequence is similarly Kiel_1_10drops_80C.met). You can save a copy of this sequence if you like. The “Kiel_template.seq” is located “C:\Finnigan\Isodat NT\Global\User\Dual Inlet System\Sequence”. If you’re having trouble finding it, make sure the file type is *.seq. You should see 11 columns – PeakCenter, Pressadjust, Background, Reference Refill, Weight (mg), Sample, Line, Identifier1, Comment, Preparation, Method.
PeakCenter and Pressadjust should have a check in every row. Background and Reference Refill should have a check in every FIFTH row. Enter the mass of your sample in the Weight (mg) column. Sample should increment 2-24 every other row (e.g. 2,2,3,3,4,4,5,5). Line should alternate 1,2,1,2,etc. Enter your sample and standard name in the Identifier1 column. Enter the material in the Comment column (e.g. calcite, aragonite, siderite). Enter the sample preparation in the Preparation column (e.g. crushed, micromilled). Method should have ‘Kiel_1.met’ in every row unless you know you are using a different method.
Start the Run
The boris computer is old. As such, right before starting a run, complete these silly tasks: (1) Assuming you have saved your entries in the daily log as described above, close Firefox; (2) reboot the computer; and (3) open Isodat Acquisition and your saved sequence table. Now proceed with starting the run as described below.
If you are not running a full magazine, highlight the rows containing samples and standards. Click the "Start" button. Folder name should be prepended with “date” by checking the date box under the ‘Pre’ button. Type your sample set ID into the field. file name should be prepended with “analysis” and appended with identifier 1 by checking appropriate box under ‘Pre’ and ‘Post’ buttons, respectively. Make the export file name something meaningful to you. If you intend to use Matlab (see Data reduction below), make certain the export template is “kiel_exhaustive.wke” AND after you have done that, make certain the export file type is “.csv”. Click OK
Cleanup
Wash vessels as per the Cleaning Laboratory Glassware method.
Data Reduction
Follow these steps to use Matlab on either the North, South, or West Going ZaxThe naming of these three computers was inspired by Dr. Seuss' story about the North Going Zax and the South Going Zax (shown in the image). There is no West Going Zax in his story, but the same idea applies.  computers for data reduction and quality checking. North and South Zax are in 302A in the north west corner. West Zax is in the 303B on the north wall. Your file on the Kiel computer is located here: "C:\Finnigan\Isodat NT\Global\User\Dual Inlet System\Results\*", where * is the specific folder with your results. Copy of this file to the server (S: drive) into this directory: "S:\Data\ Projects\*\raw\". The matlab script will want a "raw" folder and a "reduced" folder inside your project folder. Open MATLAB, type “kiel”, and press enter. Select the directory and then the file. Follow the prompts. Look through the figures.
Type in any comments you have about the run and hit enter. Now scroll up through the output that was generated to see if you have:
- All measurements above minimum intensity threshold. To see the exact low intensity value, see raw data file, column ‘O’ and will be < 500 mV.
- All measurements below maximum standard deviation for d13C. The exact value can be found in the raw data file, column ‘W’ and will be > 0.05. Also, in the reduced data file, column ‘D’ will be > 0.05.
- All measurements below maximum standard deviation for d18O. See the raw data file, column ‘Z’ and find values > 0.1. Also see the reduced data file, column ‘F’ for values > 0.1
- No memory effect detected in any sample. The raw data file, column ‘S’ shows strong trend with time.
If some of your samples were listed under the above headings (would be listed by Analysis Number), you need to check the Kiel computer to verify whether or not you had bad samples that may need to be rerun. Your reduced data file is now located in S:\Data\Projects\[where you put it]. Leave a copy of this file in this folder and take a copy with you…or email it…or whatever.
Troubleshooting
** If the instrument has crashed, you must restart the software **
- Restarting the software - In the lower right corner of the screen near the clock, right click on ‘IsoDat System’ and click ‘Shut Down’. ‘Shut Down’ typically falls behind the Windows menu bar and is hardly visible thanks to IsoDat software engineers. When prompted, click ‘Yes’. If you can’t accomplish this, reboot the computer. After everything is done, open IsoDat Acquisition and wait for the software to restart.
- Why did it crash - If the instrument has crashed, try to assess why. Read the Info log at the bottom of the screen to see what errors have occurred. Scroll up line by line to see what happened prior to the crash. Look at the Kiel and try to determine roughly what sample vessels are in place. How much liquid nitrogen is left?
- "Can't reach trap temperature..." - If the Info log has an error that reads something like “Can’t reach trap temperature…” it has either run out of liquid nitrogen OR the liquid nitrogen refill parts in the blue dewar have become clogged OR the software decided to make everyone think there is a problem, when really nothing is wrong. In any case:
- Drop the blue dewar and allow those parts to thaw and dry.
- Check the amount of liquid nitrogen in the 180 L / 230 L cryo cylinder (a.k.a. dewar).
- Ensure the liquid nitrogen cryo cylinder has around 20 to 35 psi of pressure. If pressure appears significantly below 20 psi, open the green valve on the dewar until the pressure reads 20 - 35 psi, then close the green valve. You may have to keep an eye on this pressure for the next several hours in case it drops again.
- If the Kiel truly ran out of liquid nitrogen, disconnect the empty 180 L / 230 L cryo cylinder and connect a new large floor cylinder.
- Use compressed air to blow the refill parts of the Kiel dry.
- Note the carousel position indicated in the software.
- Close the software by right clicking on the IsoDat System icon that is located in the Windows System Tray (next to the clock, very lower right) and select Shut Down. If Shut Down is grayed out, press Ctrl-Alt-Del, select the Processes tab, and close IsoScan, WorkSpace, Iso This and Iso That, etc etc.
- Reopen Acquisition.
- Set both traps to 26 °C.
- Look at the carousel and verify that it really is in position 1 like the software says. If it is not, double click on the number 1 showing the position and hit enter.
- Once the carousel is done moving, make sure the vessels that are attached belong in position 1. If not, move the carousel back to the position you noted above. Attach the vial(s). Move back to position 1.
- Note: "Line 1" in the Isodat Acquisition software refers to the inner circle of the carousel; "Line 2" refers to the outer circle of the carousel.
- Non-crash stop - Sometimes the instrument will stop (but not crash) for no apparent reason. Assess which sample it crashed on and go to step 1.
- Jumo iTron Kiel oven temperature controller is blinking 9999 - Gently jiggle it until stable. Wait for internal temperature to reach set point (70 °C).
- View past entries of the Info box log: Finnigan\Isodat NT\Global\bin\Info Window log file\workspace
Suggested Reading
- Coplen TB, Kendall C, Hopple J. Comparison of stable isotope reference samples. Nature, 302, 236-238. (1983).
- McCrea JM. On the isotopic chemistry of carbonates and a paleotemperature scale. Journal of Chemical Physics, 18, 849-857. (1950).
- Santrock J, Studley SA, Hayes JM. Isotopic analyses based on the mass spectra of carbon dioxide. Analytical chemistry, 57, 1444–1448. (1985).
- Tobin TS, Schauer AJ, Lewarch E. Alteration of micromilled carbonate δ18O during Kiel Device analysis. Rapid Commun. Mass Spectrom., 25, 2149-2152. (2011).