The denitrifier method uses Pseudomonas aureofaciens bacteria to denitrify nitrate (NO3) to nitrous oxide (N2O). The general workflow, assuming all supplies are on hand, is to inoculate bottles on day 1, harvest those bottles and inject your samples on day 2, start the mass spectrometer on day 3, bake out the mass spectrometer, and lastly, if no other runs are scheduled, set the system to idle on day 4. Some flexibility exists within this framework. This particular method focuses on day 3+.
The isotope ratio mass spectrometer (Brave Irene) Finnigan DeltaPlus can be configured to run N2O as N2O (m/z 44, 45, and 46) or as O2 and N2 (m/z 32, 33, 34, and 28, 29) via hot gold tube pyrolysis of N2O. This flow diagram may be helpful.
Safety
Appropriate precautions should be taken to protect yourself against extreme temperatures as you will encounter a range from very cold liquid nitrogen temperatures to very hot baking out parts. Wear eye protection and leather gloves when handling liquid nitrogen. You will also be using sodium hydroxide and, when doing so, should wear eye protection and nitrile gloves.
Terse Procedure
Prepare the instrument by making sure (a) a bake-out was completed after the previous run, (b) everything is at its intended running temperature, and (c) that the GasBench is set to measure N2O or O2 / N2.
Prepare your sample vials with NaOH and antifoam.
Complete the Daily Log.
Fill out the Sequence table.
Check the flow rate after you have started the run, while the needle is in the first vial.
Make sure you are getting peaks while it is running.
Reduce your data.
Instrument Preparation
Water trap, ethanol dewar, and water trap bake-out space.
Bake-out Complete -- Make sure everything associated with the bake-out procedure (see Baking Out the Instrument) has been completed since the last run and the system is ready for samples. A bake-out needs to be completed after every run.
-60 °C chiller is on AND cold -- Plug in the chiller using the brown extension cord coming up out of the cabinet below. Use the digital thermometer to verify the temperature is below -40 °C before running. Top off the ethanol as needed; the liquid level should be near the top of the dewar. We are currently using "Shandon Reagent Alcohol" as "ethanol". If the ethanol appears solid, it needs to be replaced with fresh ethanol. To replace the ethanol: remove the water trap, loosen the clamp on the dewar, discard the ethanol into a white dish, and add fresh ethanol to the dewar. When the discarded ethanol is room temperature, it can be dumped down the sink drain.
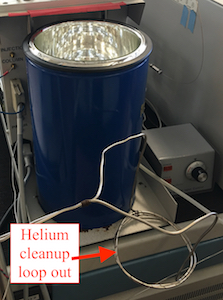
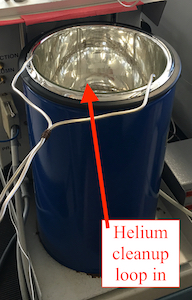
Helium clean-up liquid nitrogen trap -- This is a loop that is within the large blue Precon liquid nitrogen dewar. Be careful when inserting it before running or removing it after running to allow it to thaw between runs.
GasBench GC temperature -- The GasBench GC should be at lab temperature. The set point is 0 °C and the measured temperature should be ~ 22 °C.
Precon liquid nitrogen dewar -- Before filling the blue liquid nitrogen dewar on the Precon, check if water liquid or ice needs to be removed. This dewar often collects water at the rim during a run. The ice, or if melted, liquid water, should be removed before each run by putting the liquid nitrogen back into a capped handled dewar and then allowing the Precon dewar to warm up. You can speed up the warming by filling it with hot water, dumping the water, and wiping out the dewar to dry it.
Precon ascarite / magnesium perchlorate reagents
PreCon Reagents -- The reagents should be checked weekly and changed when necessary. Pack a 17.5 cm long 3/8" OD pyrex tube with half ascarite and half magnesium perchlorate separated by glass wool and glass wool at either end. Use the vortex to pack down the ascarite and magnesium perchlorate. Remove existing trap, install the new trap, tighten with wrenches, leak check. Try to remove the reagents from the old pyrex tube using the narrow yellow-handle screw driver from the column-packing box. If successful, wash the pyrex tube as per Cleaning Laboratory Glassware instructions. All reagent waste goes into the labeled waste container.
Helium pressure and gold tube controller
Measuring N2O or O2 / N2 -- Make sure the Gas Bench valco valve is ready for you to measure the species of interest (N2O vs O2 / N2). If you are interested in the 17O of nitrate, you must measure your samples as O2 and N2 by passing the N2O through the gold tube. If, however, you are measuring nitrate quantities lower than 50 µmol, you probably want to use the N2O method. See the "Switching" section below for specific instructions on how to change the valve. This step also includes making sure the gold tube is set to 800 °C if you wish to measure O2 / N2.
Set Precon Carrier Pressure - Turn the Precon helium Carrier pressure up to about 0.5 bar. You will set this more carefully after you start the run while the instrument is sampling the first vial.
Switching between N2O and O2 / N2 methods
On the computer, in the program IsoDat Acquisition, change the Gasbench valco valve button (located in the Gas bench window) to the appropriate setting by clicking on it once. For N2O analysis, make sure valve is in "Load" position. For O2 / N2 analysis (gold tube method), make sure valve is in "Inject" position. Make sure to run through the daily log backgrounds AFTER switching the valco valve.
Sample Preparation
Lyse bacteria -- All bacteria must be dead to prevent any further activity that might affect your samples. Lyse the bacteria with 0.2 mL 10M NaOH and shake well. Wipe off all NaOH from tops of septa. Make sure vials are right side up.
Antifoam -- After the vial side-walls have had a chance to drain from previous step, add a few drops of well mixed antifoam-B into media solution and 5-10 drops to the inside-walls of the vial. Do not shake at all. This will allow fresh antifoam to reside on the side-walls of the vial. Anitfoam-B must be well mixed to be effective. Make sure you shake the syringe before using it. Wipe off all antifoam from tops of septa.
Fill rack with vials -- The first and last position vials should be an N2O-in-He and you may choose to include them throughout the run (e.g. every 10 vials). They help to monitor instrument drift as well as presence / absence of sample peaks. Flush an empty, freshly capped vial with N2O-in-He for 30 seconds using the cylinder in the mass spec lab. If you must make an N2O-in-He using pure N2O, inject at most 0.5 µL into a 20 mL vial.
Oil -- Put 2 drops of vacuum pump oil on the top of each septum. The oil acts to lubricate the needle as it pierces the septum. The autosampler does not have the strength to push a dry needle through a dry septum.
Daily Log
The lab uses a daily log for each instrument or preparation line to allow users a first glance at the readiness of the instrument. By comparing the current state of the instrument to historical states, you are more informed about the instrument and whether or not it is functioning properly and ready to run your samples.
Each daily log is web based and browser accessible. No link is provided here by design. Open the browser on the controlling computer and you should see at least two tabs already open. One tab is this SOP and the other is the daily log. If the browser has more than two tabs open, it may have additional SOPs. Use the bookmark toolbar as needed if tabs have been closed.
Work through each cell of the daily log. If you are uncertain where to find certain information, hover over the column header tip, denoted by a circled 'i' (ⓘ).
Make certain to press the 'save to log' button when you are finished entering data.
You are welcome to make notes if you have observed something with or done something to the instrument and would like to document that information. Use the "insert note" link at the top of the daily log to make a note. You may enter notes at any time.
Sample Sequence
Open "N2O_Samples.seq" or "O2N2_Samples.seq" sequence from the left side of the screen within the "File Browser" window under the "Sequences" tab.
Make sure every row in the peak center column is checked.
Make sure the "AS Sample" column increments by 1 for each row from 1 to the # of vials you have.
Make sure the "AS Method" column has ">Internal No 9" selected.
Identifier 1 – Sample / Standard name.
Identifier 2 – Nitrate concentration of the sample/standard in μM.
Comment – Sample / Standard injection volume in mL.
Make sure the Method has "N2O_samples.met" or "O2N2_samples.met" selected.
Highlight the rows containing the vials you wish to run.
Running Samples
Last chance checklist:
the water trap should be at -60 °C
the GC should be set to 0 °C (room temperature)
the IRMS heaters should be off
the VOC trap should be at room temperature.
Start the run:
Highlight rows if not running the entire sequence
click Start
enter your sample set name in the field next to "Folder Name" and "Export File Name"
click OK
You are NOT done yet:
Wait for the first sample to start.
After the needle has been inserted into the first vial, watch the ball flow meter until it stabilizes.
Adjust the Precon Carrier pressure until the ball flow meter reads and stabilizes at 113 (this corresponds to 60 mL / min).
Adjust the pressure SLOWLY. If you turn it down, you must give the system time for that excess helium pressure to dissipate.
If you can not reach 60 mL / min, something is wrong and you should stop the run AFTER this first vial.
Assuming you were able to reach 60 mL / min, stick around the lab until you see peaks for the first vial that look reasonable.
Come back later in the day to top off the liquid nitrogen in the dewar.
Run Completion
Shortly after your run has finished, either complete a bake-out followed by putting the system into idle mode, or if you do not have time for the bake-out, just put the system into idle mode. The system is using helium at a very high rate until you show up to put it in idle mode.
Idle Mode
Turn the Precon helium down to idle. Note this is not zero. The pressure needle on the precon helium gauge should be slightly above the peg.
Turn the Gold tube down to zero.
Unplug the water trap chiller.
Data
After your run is finished, use matlab to reduce the data.
Here is the path to you data file C:\Thermo\Isodat NT\Global\User\Gas Bench\Results\[YOUR FOLDER STARTING WITH DATE]\Excel\[YOUR .CSV FILE].
You can use the "Results" shortcut on the desktop to get you most of the way.
You only need the .csv file. You do not need the entire folder of Irene specific data files (.dxf).
Copy this file to the server S:\Data\projects\[YOUR PROJECT FOLDER]\raw.
Go to the "North Going Zax", "South Going Zax", or "West Going Zax" computers and open Matlab.
Type irene and hit enter.
Follow prompts.
Output summary file is located S:\Data\projects\[YOUR PROJECT FOLDER]\reduced.
Bake-out
A "bake-out" is the process of heating up portions of a system in order to remove contaminants or otherwise undesirables. Most of the time water is the undesirable. Here we need to heat up water trap to remove trapped water, the VOC trap to remove the trapped volatile organic compounds, the GC to remove adhered CO2, and the mass spectrometer for good measure. This bake-out should be completed after every run or before the next run. Note, if the instrument was not baked out following the previous run, AND, it is presently in idle mode, you will need to wake it up by turning the precon helium to running pressure.
Water trap -- The water trap is held at -60 °C during analysis and acts to trap any water vapor that is carried away from the sample vial. It also acts to prevent liquid media from traveling into the PreCon in the event of excessive foaming while purging. This trap needs to be thawed and baked out between each run. You can leave the immersion cooler on if you are going to run again the same day.
Screw the plastic white cap onto the vent on the top of the PreCon. (Note: ensure the He carrier dial on the front of the PreCon is turned up to "running".)
Then, remove the water trap out of the ethanol dewar, taking care not to tangle the tubing with anything, and place the trap into the heat-tape-foil-wrapped pipe. You will start it heating with the mass spec software in just a minute. Helium is flushing out both holes of the needle, so any water should evaporate and exit out the needle. If you are recovering from no peaks due to a clogged trap, allow the trap to become very hot, use gloves, pick up the trap while hot and CAREFULLY invert it such that any liquid inside will flow out the exit arm and then out the needle (look at the needle to see if it's dripping).
irene cleanup trap - out of dewarirene cleanup trap - in dewarHelium clean-up trap -- This is the loop that sits in the bottom of the blue PreCon liquid nitrogen dewar and acts to scrub the helium of any condensables. Lift it free of the dewar and allow it to dangle and warm up to room temperature. Leave it out of the dewar for the entire bake-out procedure. Replace it back into the dewar after the bake-out procedure.
VOC Trap -- The VOC (Volatile Organic Compound) trap retains any organics that are carried away from the sample vial. If these compounds make it to the gold tube, the organics will react and harvest all oxygen from your sample. Turn the Thermolyne controller located between the PreCon and the autosampler to 1.5. The VOC trap is supposed to bake at 180 °C. Use the yellow thermocouple meter and plug the VOC thermocouple in to see the temperature.
VOC trap temperature controller and GasBench GC controllerGC columns -- The GasBench GC box has two GC columns in it. One for N2O and one for O2 / N2. Both always have helium flowing through them and can be baked out at 200 °C. At the east side of the GasBench, press the "P" button on the "Jumo iTron 16". WATCH OUT FOR THE TINY CAPILLARY TUBING! Press the up arrow until the set point temperature reads 200 °C, press the "P" button again to apply this selected temperature. Repeat this sequence when you are finished baking out the GC's except the set point will be 0 °C (no heat at all, the GC box can not be cooled, this is lab temperature).
IRMS -- Some of the heaters inside the mass spec will also be on during the bake routine in the next step.
Start the bake sequence -- Using the mass spec computer, find the sequence called "BakeInstrument.seq" and run both lines by hitting start and then ok. This will heat the water trap for 10 minutes (and get very hot 300 °C) and also heat the mass spec. Then those heaters turn off and the instrument continues to provide a trace for another 50 minutes. Once this trace is complete (and the hour long bake routine is done), turn the GC to 0 °C as described above and turn the VOC trap off. You may need to set the water trap on top of the gas bench to allow it to cool before placing it back into the ethanol dewar.
Clean up and waste disposal
Sample vial media with NaOH -- This media, while sterile (because of the NaOH) is very basic and must be neutralized. Use the crimp cap removal tool to pull off the caps. Discard the caps into the trash and pour the media into a 1 L glass media bottle which needs to be labeled "High pH Waste". When this bottle is full, neutralize the liquid with Hydrochloric acid (HCl) waste (this is a 10-20% HCl solution that has previously been used to acidify soil or rock samples). Use pH paper to verify it is neutral. If you overshoot and make it acidic, use the carbonate that is in the hood to bring it back to neutral. Pour the neutral pH liquid down the drain and flush with water. Enter the appropriate information into the drain log.
Centrifuge tubes -- Rinse caps and centrifuge tubes with alcohol. Rinse caps and vials 3x with DI water. Invert tubes in rack. Rinse rack with DI water. Place caps upside down on rack. Place rack with tubes and caps in clean-dish hood to dry overnight.
Syringe Needles -- All syringe needles go in the red plastic sharps container.
Troubleshooting
Irene Gasbench Helium Cylinder Pressure is LOW
The Irene Gasbench regulator has two valves allowing you to switch from the main helium cylinder (yellow arrow on right) to the backup cylinder (red arrow on left).
Helium must either be flowing through the Gasbench at all times OR the needle valve in the mass spectrometer case needs to be closed. If the Irene Gasbench Helium cylinder pressure is low, you have two options:
Switch to the backup helium cylinder - Generally choose this option. It is the easiest and least invasive. The Irene Gasbench has two helium cylinders connected to it. Both are located on the south wall. The main cylinder is in front and the backup is in the back. Once you have successfully switched to the backup helium cylinder, you can safety change the main cylinder.
If both the primary and backup cylinders need to be changed or if you know you are going to interrupt helium flow to the Gasbench, it is important that you protect the mass spectrometer from atmospheric air. Follow these steps to increase happiness.
Needle valve in Irene
Close needle valve - on North side of Irene, unlatch door with built in fan. Small needle valve is located within (see photo to help identify). Close to finger tightness. How do you know it's closed? Check the vacuum gauge on IsoDat Acquisition, it should read something like Vac 2.0e-008 mBar.
Swap the helium cylinder(s).
Turn both cylinders on and check for leaks.
allow helium to purge for at least an hour.
Turn off the source.
Open needle valve all the way.
No sample peaks during a run
Make sure the liquid nitrogen dewar has liquid nitrogen in it otherwise the mass spectrometer cannot produce sample peaks and the sample cannot be analyzed.
Did the needle insert completely into the sample vial? If you did not oil the septum (or did not wipe all NaOH and antifoam off the septum before oiling) the needle may have jammed half way in.
Are you getting samples peaks for N2O in helium but not bacteria? Could be the batch.
Low / Small Peaks
Look to see that the vials are bubbling when the needle is injected, if it is not, the needle is clogged.
Check for leaks using the helium leak detector.
Does the N2O-in-He produce peaks.
High Backgrounds
May indicate there is a leak. Use the helium leak detector and check for leaks.
Pay particular attention to the valves as they have a history of leaking.
Suggested Reading
Sigman DM, Casciotti KL, Andreani M, Barford C, Galanter M, Böhlke JK. (2001) A Bacterial Method for the Nitrogen Isotopic Analysis of Nitrate in Seawater and Freshwater. Analytical Chemistry 73: 4145-4153. doi: 10.1021/ac010088e.
Casciotti KL, Sigman DM, Galanter Hastings M, Böhlke JK, Hilkert A. (2002) Measurement of the Oxygen Isotopic Composition of Nitrate in Seawater and Freshwater Using the Denitrifier Method. Analytical Chemistry 74: 4905-4912. doi: 10.1021/ac020113w.
Kaiser J, Hastings MG, Houlton BZ, Röckmann T, Sigman DM. (2007) Triple Oxygen Isotope Analysis of Nitrate Using the Denitrifier Method and Thermal Decomposition of N2O. Analytical Chemistry 79: 599-607. doi: 10.1021/ac061022s.