Solid CN Isotope Analysis
Introduction
This document outlines how to run Shrek for carbon and nitrogen isotope analysis of solid materials using the Eurovector Elemental Analyzer. Shrek, a Finnigan MAT253, is set up as a continuous flow isotope ratio mass spectrometer for the analysis of carbon, nitrogen, and sulfur isotopes. It has one elemental analyzer (EA), a custom low-N setup, and one peripheral / mass spectrometer interface (Conflo III). Use the Terse Procedure section if you already have a good idea of what you are doing. See the Exhaustive Protocol section for more thorough descriptions. This flow diagram may be helpful, although it is rather outdated.
Safety
Risks associated with this method include high temperatures, chemicals, and possible broken glass.
Appropriate precautions should be taken to protect yourself against the high temperatures in and around the elemental analyzer so as not to burn yourself. Wear protective gloves and eye protection when exchanging columns.
Some of the reagents use inside the elemental analyzer are hazardous. Complete all work associated with elemental analyzer reagents in a fume hood with protective gloves and the fume-hood sash at an appropriate height. Failure to do so may result in exposure. Users are expected to know the contents of the SDS for each of the ingredients of the columns and know what to do in case of exposure or spillage.
The reaction columns inside the elemental analyzer are quartz. If they break, expect sharp edges and don protective gloves less you risk lacerations.
Terse Procedure
- Weigh samples – A typical tray of 49 drops should proceed qtycal_GA1 2x, qtycal_GA1 1x, qtycal_GA1 1/4, qtycal_GA1 1/2, 3 standards, 8 samples, 3 standards, 7 samples, 3 standards, 8 samples, 3 standards, 7 samples, 3 standards, and 3 blanks. Consult the microbalance method.
- Previous run finished / Instrument idle – Look in Info box to make sure it is no longer running. If idle, bring it out of idle state.
- Prepare instrument – Note the m/z 28 signal with the dilution off. Turn dilution back on, then change helium valve from IRMS Conflo to flow meter. Install new insert if needed. Adjust O2 valve as appropriate for your samples.
- Load samples – Close isolation valve, vent autosampler, open autosampler lid, check carousel position, load samples, close and secure lid, begin evacuating autosampler.
- Sequence table – Open appropriate sequence. Enter masses and sample / standard identifiers. Ensure your desired method is selected.
- Purging autosampler – When you are finished evacuating the autosampler, close vacuum, open helium purge valve, wait 1 minute, open vent valve for 5 minutes, close vent valve, wait 1 minute, close helium purge valve, open isolation valve, check helium flow at flow meter, switch helium valve back to mass spec, then keep venting helium from top of autosampler and watching m/z 28 signal until it stabilizes very near 20 mV.
- Daily Log – Once autosampler is completely purged with helium, complete a row in the shrek daily log.
- Start – Highlight rows containing samples and standards if carousel is not full. Click the Start button. Folder Name should be your sample set ID. Leave File Name alone. Export Format should be .csv and File Name should be sample set ID. Click OK.
- Data – Move ONLY the .csv file from C:\Thermo\Isodat NT\Global\User\Conflo II Interface\Results\*\excel\ to S:\data\projects\*\raw\, where * is appropriate directory for your run and your project. Create a folder called ‘reduced’ at the same level as ‘raw’. Open matlab and type ‘shrek’. Type comments, look at figures, etc. A reduced data file was placed in the ‘reduced’ folder.
Exhaustive Protocol
Weighing samples
The target quantity for nitrogen is 40 µg. The target quantity for carbon is 20 µg with the dilution off and 200 µg with the dilution on. Divide the target quantity by your samples nitrogen or carbon content to determine the mass you must weigh to hit the target (e.g. 40 µg / (9.5%/100) = 421 µg). Here is a table of our common in-house reference materials and the target weights to hit the 40 µg N mark. Consult the microbalance method.
| Standard | Material | Nitrogen (%) | Target (mg) |
|---|---|---|---|
| GA1 | Glutamic acid | 9.5 | 0.421 |
| GA2 | Glutamic acid | 9.5 | 0.421 |
| SA | Salmon | 11.8 | 0.339 |
| PL | Peach Leaves - NIST1547 | 2.94 | 1.361 |
| MAL | Malachite Lake Sediment | 2 | 2.0 |
| Standard | Material | Carbon (%) | Target (mg) |
|---|---|---|---|
| GA1 | Glutamic acid | 40.8 | 0.049 |
| GA2 | Glutamic acid | 40.8 | 0.049 |
| SA | Salmon | 45.7 | 0.044 |
| PL | Peach Leaves - NIST1547 | 45.5 | 0.044 |
| MAL | Malachite Lake Sediment | 39 | 0.051 |
Samples are typically weighed into tin capsules. We do have silver capsules available, but tin provides better flash combustion. We have various sizes of capsules depending on the quantity of material you intend to weigh. Its best to weigh samples and standards into the same sized capsule. A typical tray of 49 drops should proceed qtycal_GA1 2x, qtycal_GA1 1x, qtycal_GA1 1/4, qtycal_GA1 1/2, 3 standards, 8 samples, 3 standards, 7 samples, 3 standards, 8 samples, 3 standards, 7 samples, 3 standards, and 3 blanks. Weighing lots of material presents a combustion challenge. Plan on testing for complete combustion if you are filling the medium or large capsules by dropping the suspect sample followed by a blank. The blank should not flash or glow at all and should have only a typical blank N2 peak and no CO2 peak.
Previous run
Check the Information box at the base of the IsoDat Acquisition screen to see if the previous run has finished. The information box is a play-by-play log of events that updates while the instrument is running. If the instrument was previously running and is finished, you should see a few rows indicating that the sequence finished, the last of which will have a green dot with white check mark, a time stamp, the word 'Sequencer', and the text "Sequence Finished !". It is a good idea to view the samples of the previous run as a first cut at checking for proper instrument functionality.
Instrument preparation
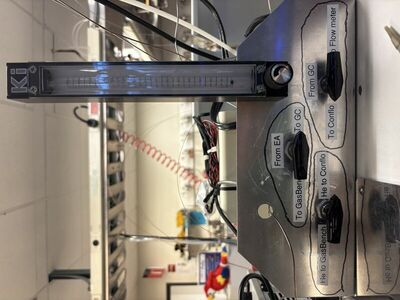
Current instrument state - Make a mental note of the N2 background and the carrier flow rate before opening the instrument up to change the insert, change columns, or load samples. Within Isodat Acquisition, change the gas configuration to N2 by using the drop-down menu in the lower left corner of the screen. Turn the dilution OFF by clicking the dilution bar in the Conflo window on the left side of the screen. Note the m/z 28 signal and then turn the dilution back ON. On top of the Eurovector EA at the switching valve bank, change the three-way valve to divert helium flow away from "To Conflo" and towards "To Flow meter". Make a mental note of the flow rate.
Change the insert - If the insert is full you should replace it with a fresh empty insert. You will only know if it needs replacing based on the number and type of samples previously run. Prepare a new insert by packing 2-5 mm of quartz wool at the base (the side with the vent slits). You may also choose to add 1-2 mm of chromium oxide on top of the quartz wool. Take the new insert and the pyrex casserole dish and place them on a step stool nearby. Assuming the isolation valve is already open, vent helium from the EA by pointing the autosampler lid valve towards the vent (away from vacuum). Use the channel-lock pliers to loosen the collar that attaches the autosampler to the top of the combustion column. Wearing leather gloves and eye protection, remove the collar and autosampler from the top of the combustion column and shift this as far back as possible so that the top of the combustion column is visible and free to access. Adjust the pliers for a smaller diameter, use the insert removal tool to grasp the inside of the insert and begin pulling it out, and then grab the insert with the pliers to remove it completely and place it into the pyrex dish. If quartz wool was stuck to the bottom of the insert, replace it with silane treated quartz wool. You can install the new insert by grabbing the top with your gloved fingers and gently sliding the insert into place (pushing the quartz wool into place with the insert if you had to install more). Blow off the rubber seal. Replace the autosampler and tighten the collar, first with your fingers, and then with the pliers. Close the isolation valve.
Replace the columns - While most labs seem to wait until the bitter end of their columns before replacing them, we find that changing them on a regular basis (weekly when running high oxygen rock samples every day) our combustion and sample reproducibility are better. Three columns are changed all at once: the combustion column, the reduction column, and the desiccant trap. The combustion column contains the quartz insert, chromium oxide, and silvered cobaltous oxide all separated by and held in place with layers of quartz wool. The reduction column contains reduced copper held in place with quartz wool. The desiccant trap is magnesium perchlorate held in place with glass wool. The reduction column will most likely be spent first and we attempt to keep track of its state by knowing the total oxygen used which is entered into the daily log. The details of packing and replacing these columns are given in below in the Reagent Columns section.
Check for leaks - If you have just changed the insert and / or the columns, check for leaks using both the helium leak detector and the flow rate. Use the helium leak detector at every connection that you disconnected for your maintenance. You can also use both the Eurovector EA flow rate and the ball meter flow rate to check for leaks. The flow rate on the Eurovector EA display will read high but the flow rate on the ball meter will read low if a leak is present. The final leak check comes from the backgrounds measured on Shrek. Higher than expected N2 and Ar generally suggest a leak.
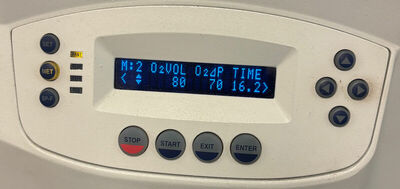
Oxygen - Check and / or adjust the oxygen amount used for combustion with the Eurovector EA control panel. To access and edit any part of the Eurovector EA parameters press MET, then use right or left arrow buttons to find the desired parameter, when it is flashing, use the up or down arrows to adjust as needed, then use the right or left arrows to scroll back until you see STO flashing, then press ENTER, then press MET to finish. The Eurovector EA can control both the volume of oxygen as well as the pressure and in doing so allows you to adjust the duration of the oxygen pulse. A normal amount of oxygen is 20 mL and 70 kPa. Large amounts of material may require 80 mL and a pressure of 70 kPa. Adjust the volume and pressure together to concentrate or diffuse the O2 pulse; you can observe this by watching the time in seconds change as you change either of those two variables.
Loading samples
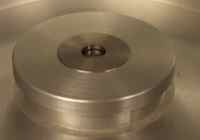
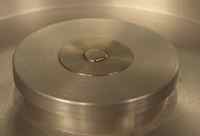
Preparing the carousel - With the isolation valve closed (arrow pointing towards you), vent the autosampler by pointing the three-way valve on the lid towards the vent (away from vacuum). Loosen the three nuts that hold the lid in place (you may need pliers) until the nut assembly hinges and falls down. Open the autosampler lid. Check the carousel for debris and blow out as needed. If you are unable to clean the carousel with it in place, remove the carousel by pulling straight up while grasping the center portion. You can remove the three screws located on the underside of the carousel to remove the base plate. Use wipes with ethanol to wipe the carousel pieces clean. Wipe the body of the autosampler in the same way. If it is still dirty, you can soak the carousel in soapy water and scrub as needed. Reassemble the carousel when dry and replace into the autosampler body. The pin in the center as well as the guide pin located underneath the carousel must line up and have a tight tolerance. You can manually rotate the carousel in either direction until the pin underneath lines up properly.
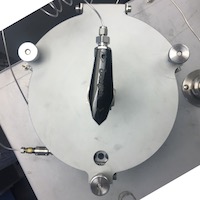
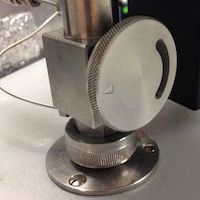
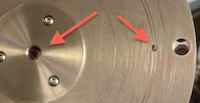
Carousel alignment - Its always a good idea to make sure the carousel holes align perfectly with each other. This step is essential if you remove the carousel for cleaning. Slide the carousel into place aligning the flat side of the center pin with the flat side of the carousel hole. THE CAROUSEL PROBABLY ISN'T ALL THE WAY IN YET. If the center pin is not completely flush with the top of the carousel hole, you must physically rotate the carousel until you feel it drop down 1-2 mm.
A guide pin underneath the carousel that needs to fit into its respective hole. Once you have the carousel completely seated into the autosampler, use the Manual Advance button on the front of the control box to move the carousel one position. Now look straight down the carousel hole. If you can see the carousel's bottom plate, you must adjust the position.

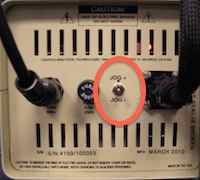
On the back of the control box, use the switch labeled Jog+ and Jog- to move the carousel very slowly forwards or backwards, respectively. It is always best to finish your adjustments in the Jog+ direction. When you think you are finished, advance the carousel with the Manual Advance button to confirm correct alignment. Then, advance carousel to desired position before loading samples (this is almost always with slot 50 over the carousel hole, so that the first sample loaded begins with slot 1).
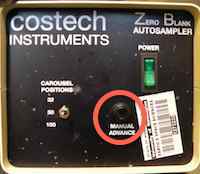
Load your samples - Using tweezers of your choice, carefully place samples and standards sequentially in the autosampler starting to the right of the hole (which may be position 50; e.g. start loading at position 1). Continue until all samples and standards are loaded. Now is a good time to make final adjustments on your sample capsules if they are very full. If they are touching multiple sides of the autosampler hole, you may want to squeeze them to be thinner and taller.
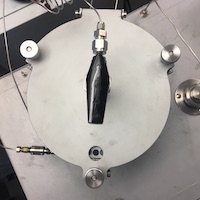
Close the lid - Wipe the o-ring with your a wipe or your finger to remove any lint or debris. Close the lid and secure the bolts into place, making them finger tight. Rotate the lid valve towards vacuum to pump out the atmospheric air from the autosampler. As it is pumping, you will need to keep tightening the lid nuts, again, to finger tightness. Evacuate autosampler for 1 minute. Tighten the knurled nuts once more.
Purging autosampler


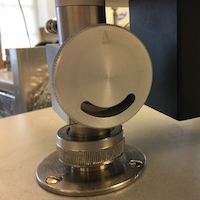
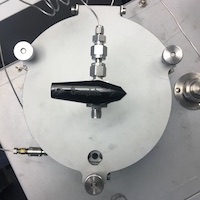

Close the three-way valve. It should now be pointing towards the cabinet between the windows. Open the helium purge valve. Wait for 1 minute. Allow the helium to vent by slowly turning the three-way valve clockwise, slowing down when the helium starts hissing, and continue turning the valve until the valve itself stops turning. The valve should be pointing at you-ish. Allow the helium to vent with the three-way valve in this state for 5 minutes. Close the three-way valve (pointing towards the cabinet between the windows). Wait 1 minute. Close the helium-purge valve. Open the isolation valve **SLOWLY**. Wait for helium flow to stabilize (it should be 130-134 mm on the ball flow meter located on top of the Eurovector EA). Change the flow meter / mass spec valve to point towards "To Conflo". Watch the m/z 28 signal and if it stabilizes below 50 mV turn the dilution off.
Sequence Table
On the left side of the screen, find the Sequence tab under the Browser window bar to open the appropriate sequence.
Peak Center - The first column is the peak center column and it should have a check in every row. A peak center is accomplished by increasing the speed of ions exiting the source forcing them to sweep from one side of the faraday cup to the other and then by decreasing the speed of the ions forcing them to sweep past the faraday cup in the reverse direction. The software sets the speed of the ions (i.e. high voltage) such that the ions are hitting the middle of the faraday cup.
Amount - Enter sample mass under the Amount column heading. This will allow for the C and N content calculation.
Identifier 1 - Enter the appropriate standard and sample names under the Identifier 1 column heading. If you intend to use the 'shrek' matlab script, make sure to type the reference materials in appropriately and identically (e.g. GA1, GA2, SA).
Identifier 2 / Preparation / Comment - Use these columns to enter ancillary information you wish to stay with each sample or standard.
Method - Make sure the method is what you want it to be. Methods with a 'dilution' tag will typically dilute the CO2 signal by 10. This is typical for modern organic samples so that both N2 and CO2 have reasonable signals. Your choice of diluting should be the same for the entire run. The dilution process fractionates. Treat all your samples and standards the same.
Zeros - Its your choice to include zeros or not. One reason to include them is if you have high backgrounds due to a fresh insert, don't have time to let the backgrounds drop, but want to see the first drop combustion. Include 5-10 zeros after the first drop. Another reason to include zeros is to ensure the mass spectrometer is functioning properly. Here you would include 3-5 zeros near the beginning of the run (probably after the first drop) and again at the end of the run.
Daily Log
The lab uses a daily log for each instrument or preparation line to allow users a first glance at the readiness of the instrument. By comparing the current state of the instrument to historical states, you are more informed about the instrument and whether or not it is functioning properly and ready to run your samples.
Each daily log is web based and browser accessible. No link is provided here by design. Open the browser on the controlling computer and you should see at least two tabs already open. One tab is this SOP and the other is the daily log. If the browser has more than two tabs open, it may have additional SOPs. Use the bookmark toolbar as needed if tabs have been closed.
Work through each cell of the daily log. If you are uncertain where to find certain information, hover over the column header tip, denoted by a ⓘ symbol.
Make certain to press the 'save to log' button when you are finished entering data.
You are welcome to make notes if you have observed something with or done something to the instrument and would like to document that information. Use the "insert note" link at the top of the daily log to make a note. You may enter notes at any time.
Start
Highlight rows containing samples and standards if carousel is not full. Click the Start button. Folder Name should be your sample set ID. Leave File Name alone. Export Format should be .csv and File Name should be sample set ID. Click OK.
Data
Move ONLY the .csv file from C:\Thermo\Isodat NT\Global\User\Conflo II Interface\Results\* to S:\data\projects\*\raw\. * is appropriate directory for your run and your project. Create a folder called ‘reduced’ at the same level as ‘raw’. Open matlab and type ‘shrek’. Type comments, look at figures, etc. A reduced data file was placed in the ‘reduced’ folder.
Reagent Columns
Combustion Column
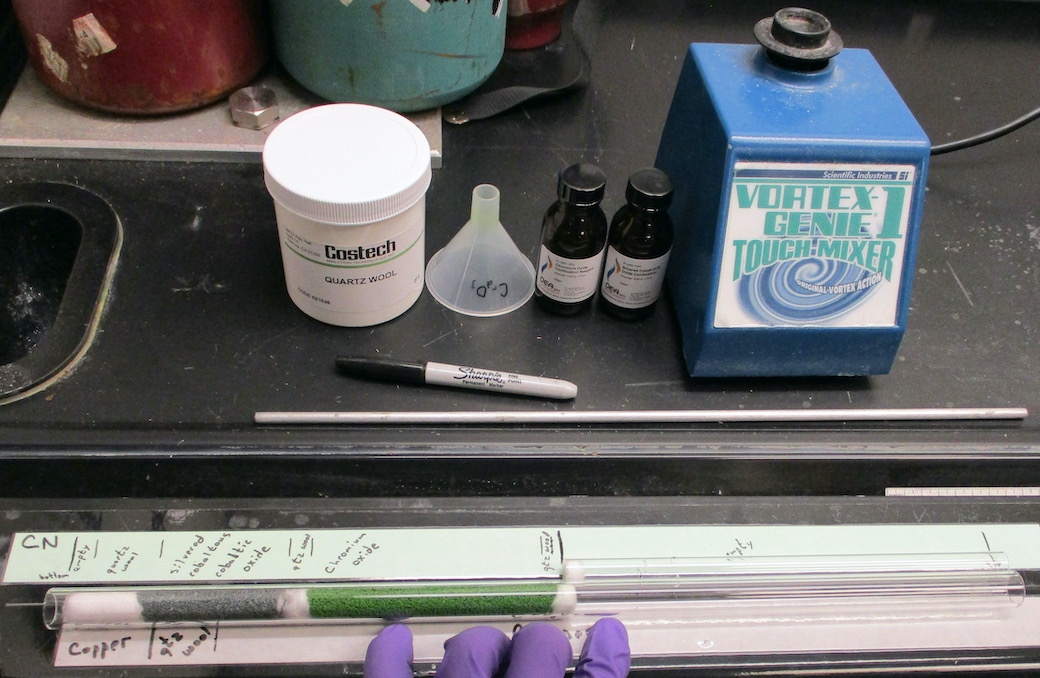
With a new empty quartz column, use a sharpie to mark the location of each of the ingredients following the recipe shown in this photo. After each reagent is added, use the vortexer to shake the material into a tighter segment. Add more material and vortex until the marked segment is filled. If you are not going to install the new columns immediately, wrap each end with parafilm.
Reduction Column
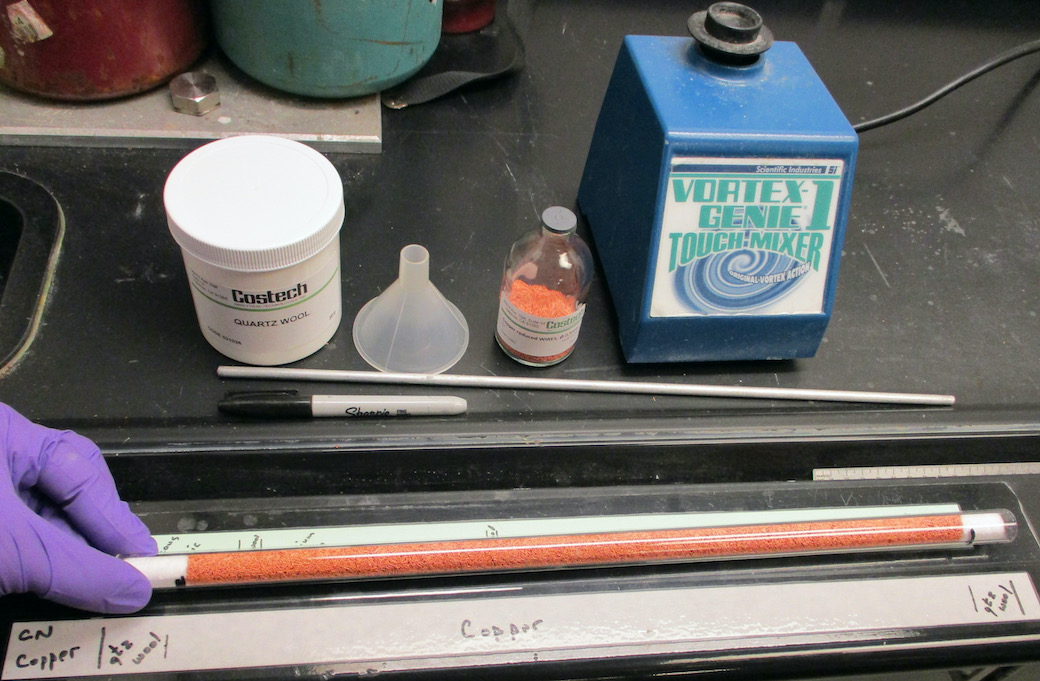
With a new empty quartz column (or one that was previously used as a reduction column and is still in good shape), pack one end with 3 cm of quartz wool. Begin filling the column with reduced copper leaving enough room, after vortexing, for another 3 cm of quartz wool at the top.
Desiccant Trap
With a clean 1/2" OD stainless steel column, pack glass wool into one end of the trap. Add magnesium perchlorate and vortex as with combustion and reduction columns. Finish with another plug of glass wool. Use compressed air to blow the ends and swage nut free of glass wool and reagent.
Nitrogen Only CO2 scrub / desiccant trap
With a clean long stainless steel tube, pack glass wool into one end of the trap. Add magnesium perchlorate to one end of the trap and vortex until about half of the trap is filled. Add a small plug of glass wool. Add ascarite or soda lime until the trap is almost full. The soda lime is usually indicating, turning from white to purple. This is helpful if you carefully dissect the column after a run because it allows you to visualize the carbon absorbing capacity. Finish the column packing with a glass wool plug. Use compressed air to blow the ends and swage nut free of glass wool and reagent.
Note - The absorption of CO2 by ascarite or soda lime produces water. If you notice reduced flow after a run with the above column (e.g. little to no flow), try a little plug of 50/50 magnesium perchlorate / quartz chips followed the the ascarite or soda lime followed by the final magnesium perchlorate section. Always check the flow after your run and pay careful attention to the water backgrounds during N-only runs.
GC Column
When the EA will not be used for at least one day, bake the GC at 110 °C overnight. Turn the EA exhaust valve away from the mass spectrometer and towards the flow meter. Take the EA out of remote mode by pressing Abort and Enter. Then press the down arrow three times to the GC temperature setting page. Set it to 110 and press Enter.
Troubleshooting
- High backgrounds – Use the mini gas leak detector to check for leaks. A helium leak will show as red LEDs. If the autosampler lid is leaking, slowly open the vent valve, open the lid, wipe the o-ring and lid clean, close the lid, close the vent valve. You can also change to Ar (mass 40) and then use the Argon cylinder to spray connections and watch for increases in signal. Try to assess if the high backgrounds are due to an atmospheric leak or are due to something internal. High N2 and Ar might indicate an atmospheric leak. High H2O may indicate a wet GC column and may need baking out.
- Unusually low backgrounds – If you are getting values twice as low or more in Nitrogen and Argon from the historical values seen in the daily log, there may be a leak large enough to prevent helium from passing into the mass spec. For example, Mass 40 has a 20-30 mV signal when it usually is ~100 mV. However, the most parsimonious explanation for this observation is the three-way valve on the shrek valve switching bank is pointed towards flow meter, rather than mass spec.
- Computer Crash – If the IsoDat software and / or computer crash, quit everything and reboot the computer. Open Acquisition and turn the source on by clicking the red sun icon in the upper left portion of the window.
Old information that may be useful someday
Instructions when the O2-N2 separation experiment was installed - (removed Jan 2021)
On the back of the control box, use the switch labeled Jog+ and Jog- to move the carousel very slowly forwards or backwards, respectively. It is always best to finish your adjustments in the Jog+ direction. When you think you are finished, advance the carousel with the Manual Advance button to confirm correct alignment. Then, advance carousel to desired position before loading samples (this is almost always with slot 50 over the carousel hole, so that the first sample loaded begins with slot 1).
NOTE - you may choose to flip the switch (located on the Costech EA control box) to 'bypass' for convenient carousel advancement. HOWEVER, make sure you end with the switch flipped toward the 'delay' option before loading samples.
Suggested Reading
- Fry B, Brand W, Mersch FJ, Tholke K, Garritt R. (1992) Automated analysis system for coupled δ13C and δ15N measurements. Analytical Chemistry 64, 288-291. doi: 10.1021/ac00027a009 .
