
Carbonate Clumped Isotope Analysis
Introduction
This document describes how to analyze purified CO2 samples in pyrex breakseals on Polly, a Thermo Electron MAT253 isotope ratio mass spectrometer, for δ13C, δ18O, and Δ47. Use the Terse Procedure section if you already have a good idea of what you are doing. See the Exhaustive Protocol section for more thorough descriptions.
Safety
Appropriate precautions should be taken to protect yourself against broken glass. This method involves scoring pyrex tubes as well as handling broken pyrex tubes. Wear safety glasses and protective gloves when scoring tubes and when cleaning out the tube crackers.
Terse Procedure
STARTING POLLY
- Make sure the last set of samples has finished.
- Close all valves in both Dual Inlet and Multiport windows except 15, 25, 32, 34, 39, and WASTE.
- Clean out tube crackers from previous run.
- Thoroughly score each sample tube in the middle and install into appropriate cracker, insert empty tubes in positions where you don't have samples.
- Open all multiport valves except bank to begin pumping out the cracker space, watch the vacuum gauge to ensure it drops below 3.9 x 10⁻³ mbar.
- Open sequence template commensurate with the number of samples you have.
- Enter sample ID in Identifier1 and sample type or description in Identifier2.
- Open valves 13, 12, and BANK.
- Fill out daily log.
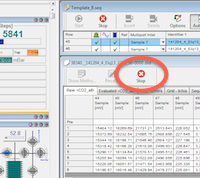
- Start the run. Type sample set ID (e.g. "Schauer_141105"). Click OK and the run will start.
DATA REDUCTION
- Copy data file to S:\Data\projects\ClumpedIsotopes\data\raw.
- Open matlab on one of the Zax computers (NorthGoingZax, SouthGoingZax, WestGoingZax) and type polly.
- If you see orange text as you are viewing each sample, it likely means the sample id from the prepline log and the mass spec sequence don't match or that the prepline log file has not been copied to the server.
- Still in matlab, type pollycompile to see the entire reference frame and to calibrate your data.
- Still sitting at a Zax computer, open the most recent file within ‘S:\Data\projects\ClumpedIsotopes\data\compiled\ARF_reduced’ to see your calibrated data.
Exhaustive Protocol
Last run finished
Make sure the last set of samples has finished analysis. Ideally, Polly never stops running. Each sequence has >30 zeros tacked on the end to keep the instrument running CO2 for several days after break-seals have finished. If all of the break-seals have been analyzed, it should be running zeros and can be stopped at any time. Press the STOP button if it is running zeros. It will be complete when you see "Sequence Finished !" in the program's Info Box. Once you see that, it is safe to continue to the next step.
Prepare dual-inlet
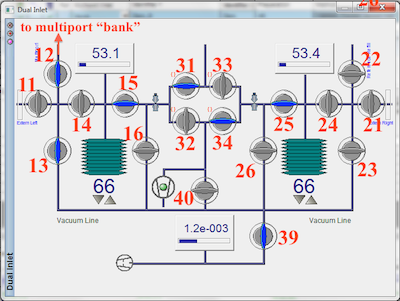
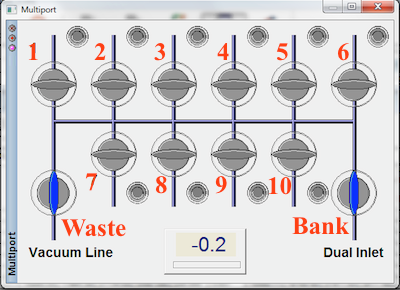
Since you are about to open part of the inlet system to the atmosphere, it is important to make sure all appropriate valves are CLOSED. Within the Dual-inlet window close all valves except 15, 25, 32, 34, 39. Valves 31, 32, 33, and 34 are called the change-over block and have predefined configurations. To close valve 31, open 32 and to close valve 33, open 34. Within the Multiport window, close all valves except WASTE. Valves are gray when CLOSED and blue when OPEN.
Clean out tube crackers
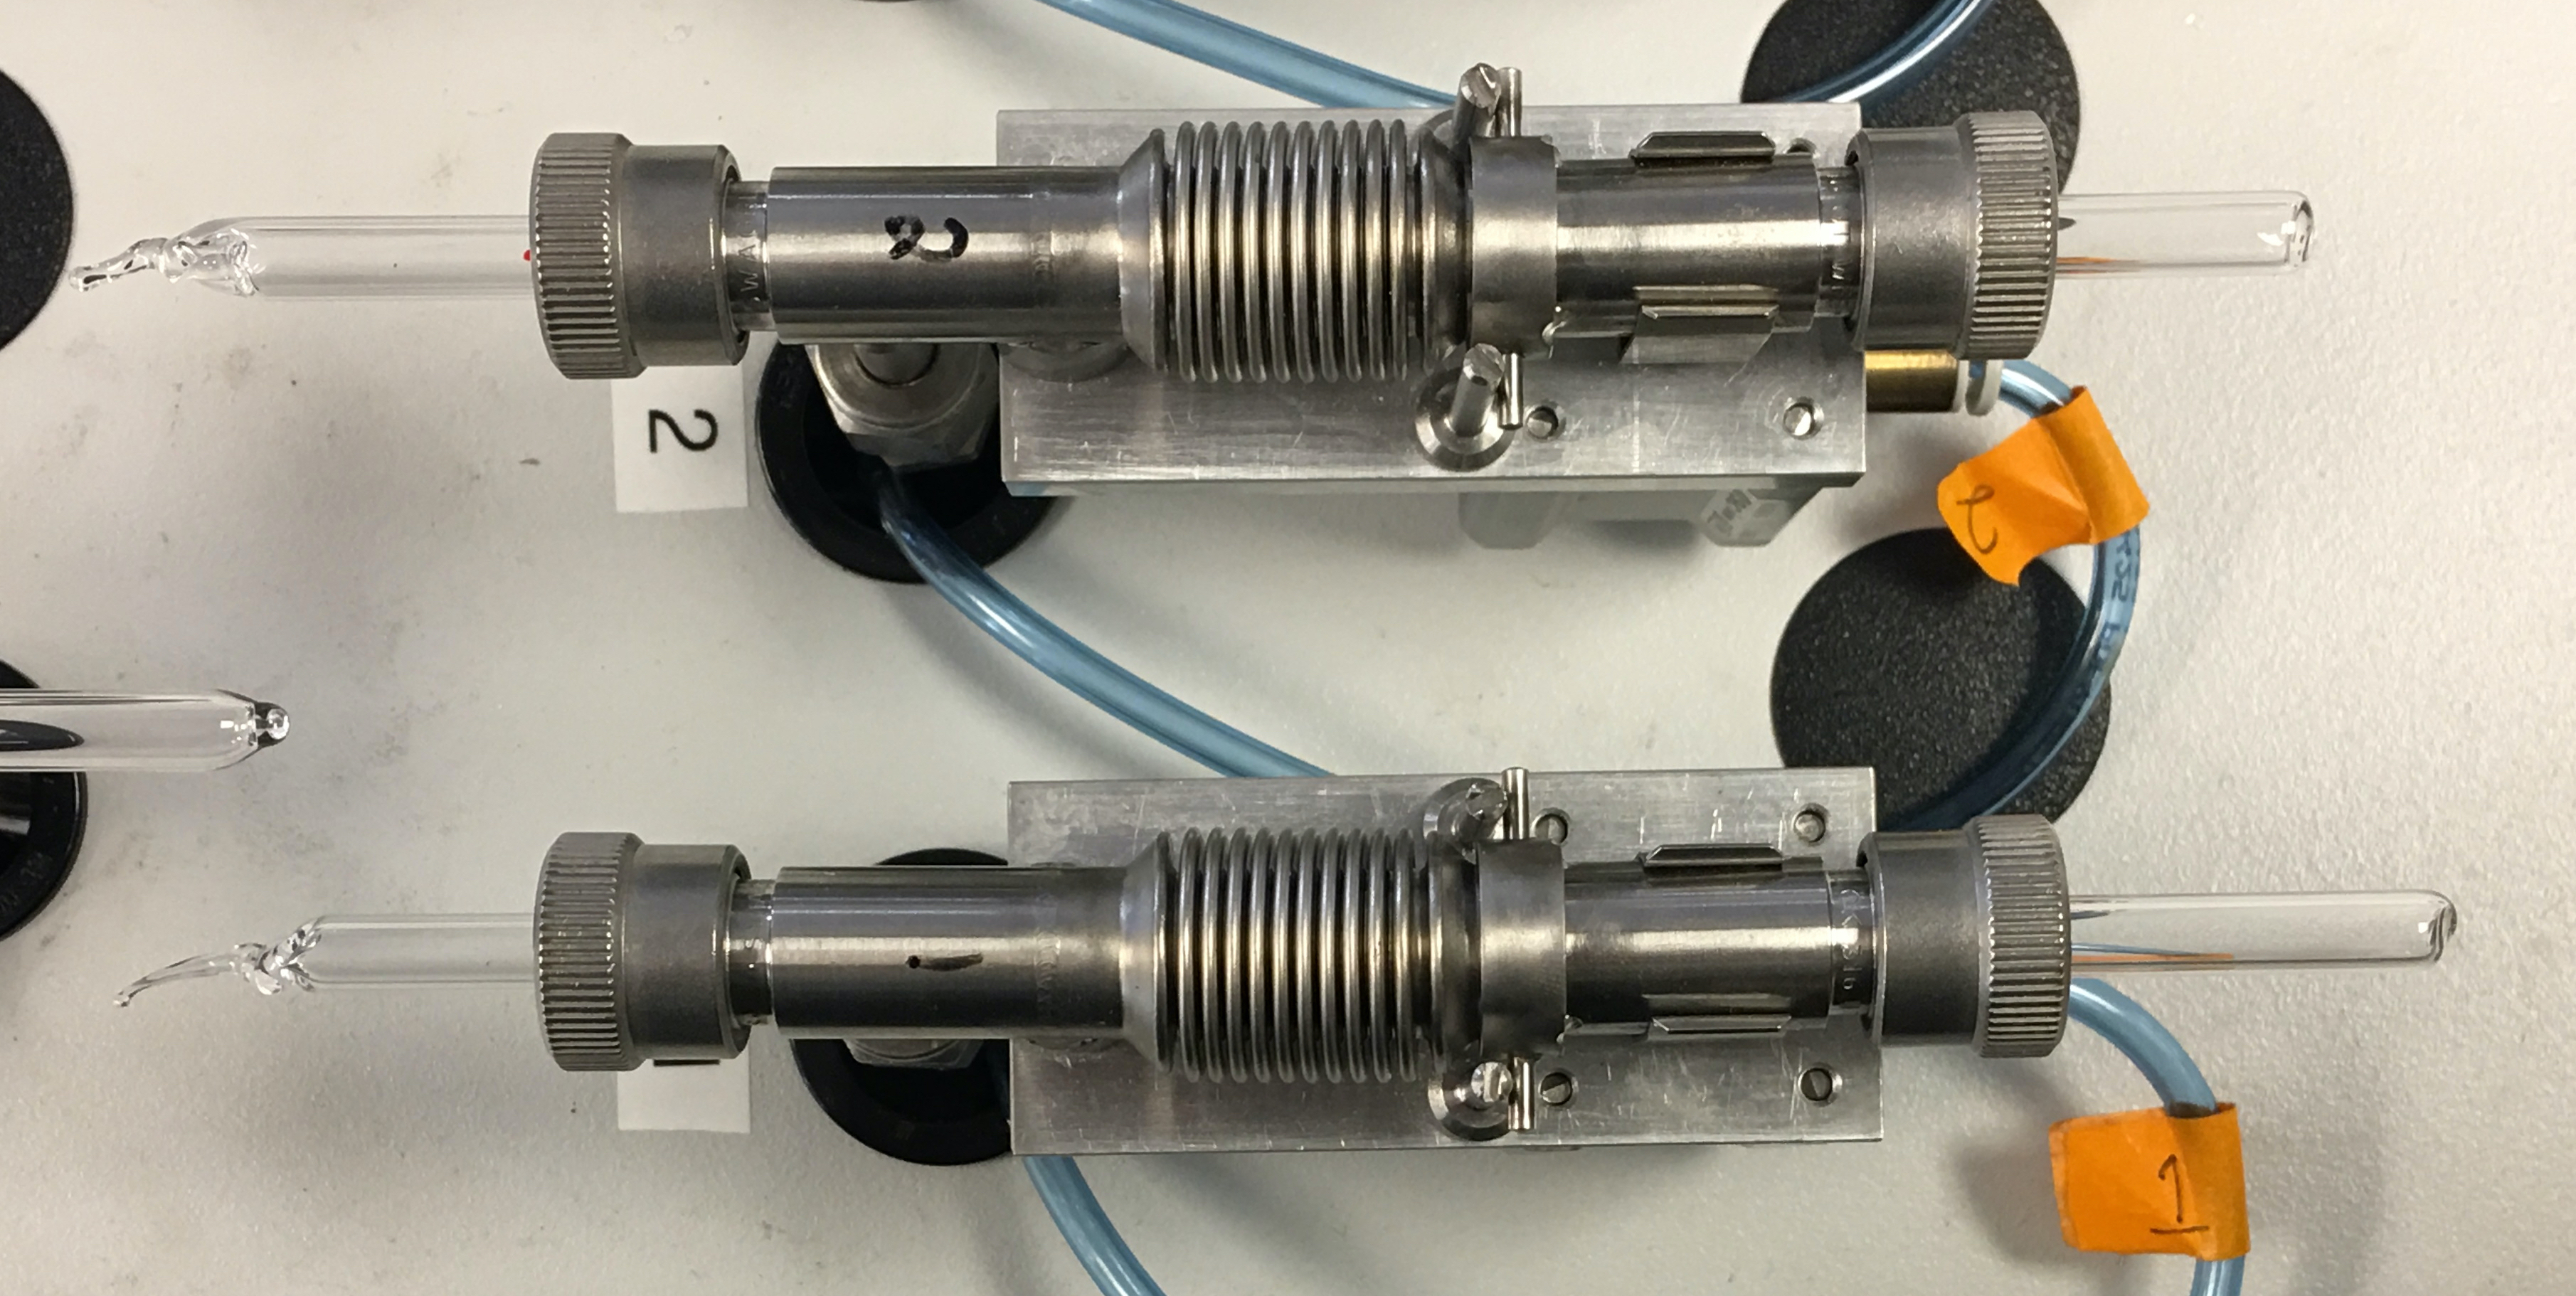
Now that the inlet system is safe, you may begin opening the ultra-torrs on the tube crackers. Loosen ultra-torr fittings on each side of the pyrex tubes and remove both pieces of pyrex. Look through the cracker. If it is free and clear of any visible glass, proceed to next cracker, otherwise, continue with reading this paragraph. If you see glass pieces, you will need to clean the cracker out completely by unscrewing and disassembling each ultra-torr and removing each o-ring. Make sure you see how the ultra-torr goes back together. Use the compressed air line and empty glass-catcher container to blast out any broken glass that remains in each tube cracker. You can also use the metal rod tool if the compressed air line isn't working. If you have taken the time to disassemble the tube crackers, check the o-rings to see if they need more grease. If they appear dry and feel dry, very lightly re-grease with Apiezon N-grease.
Install each o-ring and loosely screw on each ultra-torr fitting. If you screw the fitting together tightly without glass in place, you will push the o-ring too far into the fitting. Also, the ultra-torr will probably not seat properly and you will need to use an unused 6 mm tube to properly seat the ultra-torr.
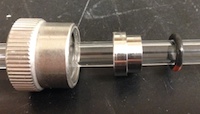
Push the 6 mm tube through the cracker, then make sure the ultra-torr nuts are just touching the o-ring (this is by feel). Remove the 6 mm empty tube and go on to the next cracker. Now the tube crackers are ready for your samples.
Install samples
Make sure your sample tubes are completely void of any ink or tape. Clean as needed. Each tube should also be dry and free of condensation or frost. If you thoroughly score each of your tubes all the way around the entire tube, and if all of us did this, the tube would crack very cleanly and the tube crackers would not have broken glass bits for us to clean out. So, thoroughly score each tube in the middle before sliding it through the ultra-torr fittings. It is also important to position the score in the middle of the tube cracker and hence in the middle of the flexible part of the tube cracker. Load samples in the order they were run through the prep line. Multiport position 1 is first and multiport position 10 is last. If you do not have 10 samples, insert unscored empty 6 mm tubes into the open positions of the multiport. These will simply be pumped out and left under vacuum until samples are installed.
Evacuate multiport
You need to make sure ultra-torr fittings on either end of each sample tube are not leaking. The most conservative approach is to open multiport valves one at a time, allowing each port to completely pump down before opening another. In this way, if one is leaking, you will know which one it is. Since dual-inlet valve 39 and multiport valve 'Waste' are already open, start by opening multiport valve 1. The pressure gauge in the Multiport window is in mbar and should drop to something near zero very quickly. The vacuum gauge in the Dual-inlet window bottoms out between 1 and 2 *10-3 mbar. If this gauge drops below 10-3 mbar, it is safe to move onto the next multiport valve. Continue opening multiport valves and waiting for the gauges until you are finished all 10 positions. An alternative approach is to open all multiport valves all at once and watch the vacuum gauge. If it doesn't drop below 10-3 mbar, one of the ultra-torrs is leaking and you now have to go back through and find it. After the vacuum gauge has dropped below 3.9 x 10⁻³ mbar, open valves 13, 12, and BANK.
See troubleshooting section below if multiport will not drop below 3.9 x 10⁻³ mbar.
Sequence table

Open sequence template commensurate with the number of break-seals you have (e.g. Template_9.seq is used when you have 9 tubes). You can find the list of sequence tables in the File Browse window at the lower left of Isodat Acquisition. You can also browse to c:\thermo\isodat nt\global\user\dual inlet system\sequence\. Each break-seal has 6 rows associated with it. The first row introduces the sample to the inlet, makes a background measurement, and then measures the sample against the reference 15 times. The next 5 rows each peak center, pressure adjust, and measure sample versus reference 15 times. Type in sample ID in Identifier1 in exactly the same way you typed it into the prepline computer. Type the sample type or description into Identifier2.
Daily Log
The lab uses a daily log for each instrument or preparation line to allow users a first glance at the readiness of the instrument. By comparing the current state of the instrument to historical states, you are more informed about the instrument and whether or not it is functioning properly and ready to run your samples.
Each daily log is web based and browser accessible. No link is provided here by design. Open the browser on the controlling computer and you should see at least two tabs already open. One tab is this SOP and the other is the daily log. If the browser has more than two tabs open, it may have additional SOPs. Use the bookmark toolbar as needed if tabs have been closed.
Work through each cell of the daily log. If you are uncertain where to find certain information, hover over the column header tip, denoted by a ⓘ symbol.
Make certain to press the 'save to log' button when you are finished entering data.
You are welcome to make notes if you have observed something with or done something to the instrument and would like to document that information. Use the "insert note" link at the top of the daily log to make a note. You may enter notes at any time.
Start the run
Click Start in the upper left corner of the sequence window. The window that pops up is for file management and it is important to use characters that Windows can make folders and files with. It is best to use ONLY alpha-numeric characters and underscores. Within the Results section, next to Folder Name, type your sample set ID (e.g. "Schauer_141105"). If these are entirely standards and you don't have a sample set ID, enter something descriptive about the break seal contents (e.g. "C64_Cor_NBS19"). Leave the field blank next to File Name. In the Export section, enter your sample set ID again. This is going to be the file that is copied over to the server. You can append your sample set ID with a run # if you like. Make sure you are exporting a .csv file. Click OK at the bottom of the run and the instrument will start.
Data reduction
Copy the datafile - When your samples have finished being analyzed, the instrument should still be running zeros. Find your data file: The easiest way is to use the Results shortcut located on the desktop. From here, the folders are sorted by the run start date. YOU DON'T NEED THIS ENTIRE DIRECTORY. Open your run folder and open the Excel folder that is contained within. Copy the data file to S:\Data\projects\ClumpedIsotopes\data\raw.
Data processing - IsoLab uses Matlab to reduce all data. Matlab scripts have been written to diagnose analyses and to make the calculations as in Huntington et al. 2009, Dennis et al. 2011, He et al. 2012, and Santrock et al. 1985. The script polly reduces the mass spec file and adds in the preparation line data file to append the current log file. The script pollycompile reads in the current log file to produce an absolute reference frame and calibrated carbonate data. The current reference frame file is called
ClumpedSampleLog_RF_201903-present_Brand_MismatchCorrected.txt.
On either the NorthGoingZax, SouthGoingZax, or WestGoingZax computers, open matlab and type polly. Browse to the file and select it. Follow the prompts. If you see orange text as you are viewing each sample, it likely means the sample id from the prepline log and the mass spec sequence don't match. Change either the raw file from the mass spec computer or the autolog from the prepline. When you are finished with the polly script, type pollycompile to see the entire reference frame and to calibrate your data. You are asked if you wish to calibrate to CDES or ETH. Generally we use CDES because, for IsoLab, the CDES calibration has wider d47 and D47 ranges. However, if you have good reason to use ETH (e.g. making data comparable to other publications), then do so. You are also asked if you wish to run an error propagation routine. The answer is typically 'no' until you have a final dataset and are ready for publication. The most recent fully reduced data can now be found within ‘S:\Data\projects\ClumpedIsotopes\data\compiled\ARF_reduced’.
You should also consider running a matlab script called polly_diag on the raw mass spec file that you selected while running polly. This script creates a suite of figures to help you visualize how each sample was analyzed in the mass spectrometer and may help you diagnose suspect sample analyses.
Loading samples while instrument is running
In the interest of efficiency, one may wish to load more samples into the tube crackers while the mass spec is still running actual samples (not zeros). If the last sample in the previously started sequence has been cracked and is presently being analyzed, it is safe to load new break-seals and get them evacuating using this procedure. Do not modify any valves except those referred to in this paragraph. Close the multiport bank valve. Also close the dual-inlet valves 12 and 13. Clean out the tube crackers as normal. Make sure the samples you are loading do not have any condensation on them from being recently frozen. Load new samples as normal. Open only the multiport valves that contain new samples or empty place-holder tubes. It is best to leave the multiport under vacuum so, if you are still going to add samples, clean out the tube cracker that will eventually have a sample in it and put an empty tube in place temporarily. The tube crackers associated with the tubes you have just loaded will now be evacuating. You can use Isodat Workspace to open the appropriate sequence template and enter the sequence you will start after the current run finishes. You can not edit a sequence in Isodat Acquisition while the instrument is running. Save the sequence once you have finished editing it. Don't worry if it is the same sequence template as is currently running because that one is loaded into memory.
Troubleshooting
Samples missing from mass spec datafile - If you know you loaded a sample that does not appear in the data file, the most likely reason for its exclusion is it was too small or too large. The sample introduction script screens samples in the multiport based on pressure. If the sample is too small to be able to pressurize the bellows enough to achieve the proper m/z 47 signal, the sample is abandoned and pumped away. If the sample is so large that the multiport pressure gauge shows a maximum reading, it is assumed the sample leaked and is abandoned and pumped away. You can check the Isodat log file to see if this is, in fact, what happened to your sample. The log file is located:
C:\Thermo\Isodat NT\Global\bin\Info Window Log Files\Workspace\Info.log
It's best to make a copy of this file and rename it to Info_yymmdd.log where yymmdd is the current date. Then open this file and start looking.
Mass spectrometer has stopped but should still be running - If you notice the mass spectrometer has stopped and you are certain it should still be running, you can check the Info box at the base of the Isodat window in an attempt to decipher why. You will likely see many red dots with white Xs. You can scroll up while reading the text to see what the mass spec was doing when it crashed and immediately before. If it failed to peak center, go look at the lights on the front of the mass spectrometer.
Multiport will not drop below 3.9 x 10⁻³ mbar - Whether you have opened all the multiport valves at once or each port individually, sequentially close each multiport valve (1-10), watching the vacuum gauge with each closure to see which port may be leaking. If the gauge drops soon after closing a particular port valve, either tighten this ultra-torr fitting set or make sure the port valve is closed and go remove your tube, check / clean / replace o-rings as needed, clean tube cracker assembly, use a wipe to clean where the o-ring sits, and reassemble with your tube in place.
If none of the multiport valves (1-10) elicit a response in the vacuum gauge, close dual-inlet valve 39. Does this elicit a response in the vacuum gauge? If not, ask yourself if it is possible that you allowed the vacuum pump to pull room air for 30 seconds or more. If yes, the pump may take many hours before it is able to reach a low vacuum again. If you don't recall or you are certain you did not allow the pump to pull room air for an extended period of time, the pump may be ready for maintenance.
Suggested Reading
- Brand WA, Assonov SS, Coplen TB. (2010) Correction for the 17O interference in δ(13C) measurements when analyzing CO2 with stable isotope mass spectrometry. Pure and Applied Chemistry, 82. doi: 10.1351/PAC-REP-09-01-05.
- Daëron M, Blamart D, Peral M, Affek HP. (2016) Absolute isotopic abundance ratios and the accuracy of Δ47 measurements. Chemical Geology 442, 83. doi: 10.1016/j.chemgeo.2016.08.014.
- Eiler JM, Schauble E. (2004) 18O13C16O in Earth’s atmosphere. Geochimica et Cosmochimica Acta 68, 4767-4777. doi: 10.1016/j.gca.2004.05.035.
- Dennis KJ, Affek HP, Passey BH, Schrag DP, Eiler JM. (2011) Defining an absolute reference frame for ‘clumped’ isotope studies of CO2. Geochimica et Cosmochimica Acta 75, 7117-7131. doi: 10.1016/j.gca.2011.09.025.
- He B, Olack GA, Colman AS. (2012) Pressure baseline correction and high-precision CO2 clumped-isotope (Δ47) measurements in bellows and micro-volume modes. Rapid Communications in Mass Spectrometry 26, 2837-2853. doi: 10.1002/rcm.6436.
- Huntington KW, Eiler JM, Affek HP, Guo W, Bonifacie M, Yeung LY, Thiagarajan N, Passey B, Tripati A, Daëron M, Came R. (2009) Methods and limitations of ‘clumped’ CO2 isotope (Δ47) analysis by gas-source isotope ratio mass spectrometry. Journal of Mass Spectrometry 44, 1318-1329. doi: 10.1002/jms.1614.
- Kelson JR, Huntington KW, Schauer AJ, Saenger C, Lechler AR. (2009) Toward a universal carbonate clumped isotope calibration: Diverse synthesis and preparatory methods suggest a single temperature relationship. Geochimica et Cosmochimica Acta 197. doi: 10.1016/j.gca.2016.10.010.
- Petersen SV, Defliese WF, Saenger C, Daëron M, John CM, Huntington KW, Kelson JR, Bernasconi SM, Colman AS, Kluge T, Olack GA, Schauer AJ, Bajnai D, Bonifacie M, Breitenbach SFM, Fiebig J, Fernandez AB, Henkes GA, Hodell D, Katz A, Kele S, Lohmann KC, Passey BH, Peral M, Petrizzo DA, Rosenheim BE, Tripati A, Venturelli R, Young ED, Wacker U and Winkelstern IZ (2019) Effects of improved 17O correction on interlaboratory agreement in clumped isotope calibrations, estimates of mineral‐specific offsets, and temperature dependence of acid digestion fractionation. Geochemistry, Geophysics, Geosystems 20, 3495–3519. doi: 10.1029/2018GC008127.
- Santrock J, Studley SA, Hayes JM. Isotopic analyses based on the mass spectra of carbon dioxide. Analytical Chemistry 57, 1444–1448. (1985) doi: 10.1021/ac00284a060.
- Schauer AJ, Kelson J, Saenger C, Huntington KW. (2016) Choice of 17O correction affects clumped isotope (Δ47) values of CO2 measured with mass spectrometry. Rapid Communications in Mass Spectrometry 30, 2607–2616 doi: 10.1002/rcm.7743.
- Wang Z, Schauble EA, Eiler JM. (2004) Equilibrium thermodynamics of multiply substituted isotopologues of molecular gases. Geochimica et Cosmochimica Acta 68, 4779-4797. doi: 10.1016/j.gca.2004.05.039